title

Motorcycles, tools, and garages! A little bit of everything mechanical and technical.

Showing posts with label Making. Show all posts

Sunday, September 20, 2015

dorkpunch engines #3: Boring the cylinder.

I had some time to kill at the shop while waiting for my wife. She said she would be over in half an hour, which of course means 2 hours. She even ran a little late so it was more like 2 and half so I was able to knock some holes in some aluminum.

1/8" pilot holes, 3" deep through the cylinder. The two for the valves are the finished diameter for the valve guides. The cylinder has a long ways to go... 7/8" more to be exact.


To drill them I had to use a big 'ole aircraft drill. Started with a normal drill bit, got as deep as it could go, then switched to this long one. Figured there was less chance of the holes going crooked on me.


Makin' chips.


Makin' BIG chips...


and big messes.


"Finished" cylinder. The drill bit is obviously a bit rough, so I plan to hone it with a brake master hone and then match the piston to the finished bore.


Because of the vice I was using, I couldn't drill all the way through. This is not a problem though, because I still need to machine off about 1/4" to get it down to the stroke I want.


Bottom.


Will hopefully start doing some figuring on where the valve ports need to go and the final diameter of the valve heads.

Thinking I should have left the bore a tad smaller- its pretty close to some of head bolt holes. Won't have a lot of gasket area in those two spots.

Live and learn...

Sunday, September 06, 2015

"It doesn't matter what you make, and it doesn't matter why. The importance is that you are making SOMETHING."


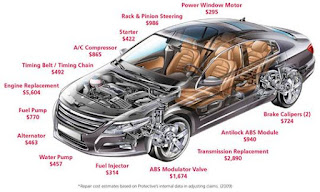
Love this.  Wife and I were talking about something the other day that made me remember this post I had started a long time ago.  We like to think we've done okay for ourselves.  Our conversation basically boiled down to the wondering why we were relatively "stable" in our lives.  What we decided is that because we know how to "make", create, build, DO- we've been able to save ourselves a LOT of money.  I was looking at a diagram the other day that showed what basic repairs on an average vehicle would cost.  This isn't the same diagram but you get the idea:


FOUR HUNDRED AND SIXTY THREE DOLLARS!?!?!  For an ALTERNATOR?!  Holy cow.  The alternator all by itself is usually less than a hundred bucks, and unless you're working on a foreign car they aren't that hard to change.   I just replaced the starter in Mrs. Punches car.  Took maybe an hour, and the starter itself cost something like $65.  Not to mention we purchased the car for under $1,000 in need of some work, with low miles, fixed it, and have put almost 70k miles on it in the last 5 years. 

Moral of the story- everyone, man-woman-or child- should now how to weld and sew, and everything in between.

Tuesday, July 07, 2015

Winnings!

So I entered my custom Hot Wheels tool box in an instructables competition, and it won some prizes!


Got sweet new shirt, a patch, a sticker, a multi-tool pen that'll go in the tool box and some kind of sensor? from Clime.  Seem to be sensors that can measure temp, humidity, and the like and connect wireless to ipads or other devices.  Apparently on back order...

Here's the instructables I wrote:  http://www.instructables.com/id/The-Utlimate-Mini-Mobile-Metalshop/

And that nifty little 12 in one tool pen can be found here:   http://www.amazon.com/12-Multi-Function-Tool-Pen/dp/B005Z7OEI2/ref=sr_1_1?ie=UTF8&qid=1436313386&sr=8-1&keywords=12+in+one+tool+pen

It'll make a great addition to my tool box!

Wednesday, May 27, 2015

Mendelmax 2.0 - 3D printed ball cap, letting slicer generate support.

Tried something new today. Let Slicer generate its own support material just to see how it would work. A student wanted to try making a hat, and I thought that was a good idea so here is my version. Pretty thin shell, printed in PLA. Really need to get back to ABS.

Took about 6 1/2 hrs to print, and without the support it probably would have taken 4.


First part bridged with the support material.


Taller,


and taller,


aaannnddddd TALLER,


Done.


Print came out pretty decent. Still trying to get a few more things dialed in but I'm happy with the quality.


The support material was a PAIN to get out. Still have some cleanup to do too.


Ended up cracking the shell in a couple of different spots trying to get it all out.


But hey, IT FITS!!!


Now to make a brim. This one's a bit small but I figure once I get everything figured out I can scale it up or down in Sketchup!

On a side note, as you can tell the hair is getting just a *tad* long...  The day I shaved after being in the play I was informed by my students SEVENTY TWO TIMES that I had, in fact, shaved.  Going to put the haircut off a few more weeks so's I don't have to endure that again!

Thursday, May 21, 2015

Sixth Grade Shoe Day.

My son had to "invent" shoes for Sixth Grade assignment. He got to my shop after school, I left for a meeting, and here's what he came up with.  Should have taken more pictures but I wasn't even in the room for most of his build!

One minor problem here... Can you see it?


It was pretty funny. I was out back observing the woods teacher and some students finish up for the day on a shed they are building. He came out and said "I've got 2 left feet"... Took me a minute to figure out what he meant!

I drilled the rivets out for him and he finished them up.


They have to wear them all day tomorrow at school. Should be interesting to see how well they hold up! I see a couple of potential fail points- the rivets holding the leather together are probably going to pull out but he'll live and learn.

Only one smushed finger out of the deal too!


I'm pretty impressed. I was worried he was going to cut himself on the metal, but he cut out both soles all by himself with the aviation snips. I sanded off the edges but other than that he designed and built them all by himself out of scraps from the shop.  Took him maybe an hour yesterday to get the soles cut out and he spent almost 3 hours tonight cutting leather, punching holes, and riveting it all together.  I think it took him a while to figure out a latch mechanism on the first one, but the second one seemed to go faster.

Saturday, April 25, 2015

Custom Hot Wheels - Lickety Split #6

Back to the drag races.  Couple of fin attempts. Took several tries, made out of a thick aluminum foil.


Interior with the shell.


So I really didn't like how the paint turned out but I didn't have time to strip and repaint. Wet sanded a bit and got this:


Still not great but okay. Next I applied several coats of turtle wax with a q-tip, really scrubbing in and then polishing the extra stuff off with a shop towel.


Came out nice, but you can see the orange peel still...

Added some chrome stripes made out of aluminum tape, then clear coated the entire thing.


Those pics were before the clear coat.  Getting closer!

Saturday, April 18, 2015

Custom Hot Wheels - Lickety Split #5

I might have gone a little overboard on engine details.  See this? (note the toothpick for size reference) That's the distributor. The shaft is 1/8" aluminum tubing stuck in another piece of bronze tubing with slots filed into for looks.


Engine coming together.  I think the final count was 23 pieces in just the engine.


The belt was made from a small strip cut from vinyl sticker material.  Was hoping to have the belt actually spin but ran out of time.

I'm good at making messes... While I was building this car I also built myself a mobile workshop to replace all the loose bits and boxes I was carrying back and forth.  You can see a few details about it HERE.  I have some more info on how I stocked it, will need to write a post about that too!


Paint on the wheels.


Paint OFF of the body...  I love stripping them down to the bare metal like this.


Working on the interior.  Seat was made by crushing a piece of aluminum tubing, then bending and filing it into the shape I wanted.


Transmission tunnel, even though the trans is behind the engine...  Had to have something to hold the shifter!  The long strip is the gas and brake pedals, still needed to be trimmed down.


More details. Fin mounts:


Getting there!

Sunday, April 12, 2015

Custom Hot Wheels- Lickety Split #4

Back to work. Once I figured out the front end with working steering, my 11 yr old son said I should make it with an actual steering wheel that worked. I kinda scoffed at him and said it would be really hard to do after he explained his idea, but it got me thinking- and I simplified it a lot and came up with this!

The start- steering column with shaft.


Short vid of it sort of working.


Steering wheel cut on the lathe, and the center hub for it made out of a teensy piece of pipe.


The first iteration.


Assembled column.


There was one major flaw with this setup. Anyone spot it?


Guess I should have thought a little more about it before I tried that out... Easy fix. Sorta.