
Motorcycles, metal working, sheet metal, welding, TIG, MIG, education, cafe racers, old trucks, mendelmax 2.0 3D printer, vintage, technology and design, custom hand made Hot Wheels, old John Deere, stationary, hit and miss engines. A little bit of everything in the garage.
Sunday, September 20, 2015
Throw Back Sunday: The original dorkpunch garage!
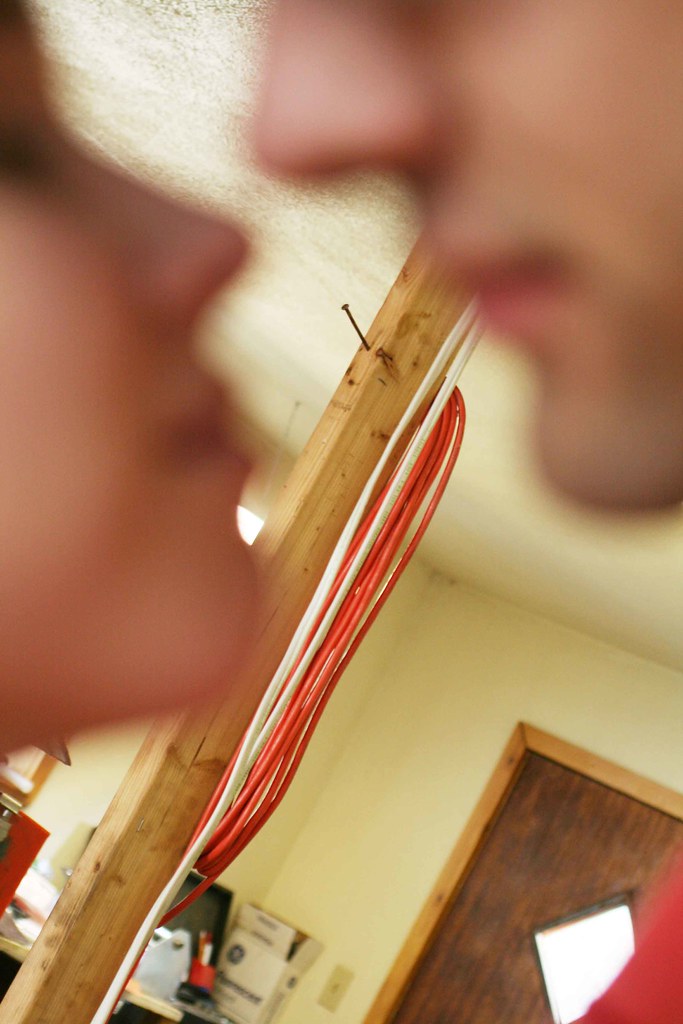
Once again was perusing Mrs. Punch's old flickr account and came across this pic. I don't remember it, although I can easily identify her (short) and me (tall) and I can tell you exactly where it was taken. This was in the garage of our very first house when we lived up in Washington. The garage had been converted to two classrooms for the church next door, then used as storage units when the house was a rental. When we bought it, I tore down the wall splitting it in half and uncovered the garage door again. You can see one of the studs I left up that was part of the old wall, and the nail for hanging the extension cord on.
dorkpunch engines #3: Boring the cylinder.
I had some time to kill at the shop while waiting for my wife. She
said she would be over in half an hour, which of course means 2 hours.
She even ran a little late so it was more like 2 and half so I was able
to knock some holes in some aluminum.
1/8" pilot holes, 3" deep through the cylinder. The two for the valves are the finished diameter for the valve guides. The cylinder has a long ways to go... 7/8" more to be exact.

To drill them I had to use a big 'ole aircraft drill. Started with a normal drill bit, got as deep as it could go, then switched to this long one. Figured there was less chance of the holes going crooked on me.

Makin' chips.


Makin' BIG chips...

and big messes.

"Finished" cylinder. The drill bit is obviously a bit rough, so I plan to hone it with a brake master hone and then match the piston to the finished bore.

Because of the vice I was using, I couldn't drill all the way through. This is not a problem though, because I still need to machine off about 1/4" to get it down to the stroke I want.

Bottom.

Will hopefully start doing some figuring on where the valve ports need to go and the final diameter of the valve heads.
Thinking I should have left the bore a tad smaller- its pretty close to some of head bolt holes. Won't have a lot of gasket area in those two spots.
Live and learn...
1/8" pilot holes, 3" deep through the cylinder. The two for the valves are the finished diameter for the valve guides. The cylinder has a long ways to go... 7/8" more to be exact.
To drill them I had to use a big 'ole aircraft drill. Started with a normal drill bit, got as deep as it could go, then switched to this long one. Figured there was less chance of the holes going crooked on me.
Makin' chips.
Makin' BIG chips...
and big messes.
"Finished" cylinder. The drill bit is obviously a bit rough, so I plan to hone it with a brake master hone and then match the piston to the finished bore.
Because of the vice I was using, I couldn't drill all the way through. This is not a problem though, because I still need to machine off about 1/4" to get it down to the stroke I want.
Bottom.
Will hopefully start doing some figuring on where the valve ports need to go and the final diameter of the valve heads.
Thinking I should have left the bore a tad smaller- its pretty close to some of head bolt holes. Won't have a lot of gasket area in those two spots.
Live and learn...
Wednesday, September 16, 2015
Alphatig 200x TIG welder #6: More from vintagespeed.
Another update from vintagespeed from ADV Rider on his Alphatig.
so here's some pics of my boogers after a 120cu/ft bottle of argon; ~ 1.5 tungstens and about 6hrs run-time.
i know it's not good, but it's my experience after 20+ yrs MIG and stick welding and never picking up a TIG machine before. i think at the end of the next bottle i'll be much happier with the results. and i'm going to pick up some stainless too, that's where the pretty welds reside.
here's a 3/32 - 1/8" gap i filled in some mild steel of different thickness, 1/8 on top of some 3/16". you can see where i undercut the hell out of the 1/8":
![[IMG]](https://lh3.googleusercontent.com/blogger_img_proxy/AEn0k_u7TJlwRrmxWxgjoFfTd7F3M5GyXB_bqC1n7B9YfP2PoGdN9KIJd4KLRqPFcrMGPo9DlOJbIE65I0X18p5OBmd7PmAfPZcuESMorE-wxSRQNUCO3OnIOHaNWPL5H3zwF0rcbwJLpsJ-tE02aTtHSneOi0OT2ssuZWhRTYlssomoXUfwVKLkOMjq-nagtrHrFi6eX713tY-o0M2W=s0-d)
definitely NOT stacking dimes, but i'd put it in service:
![[IMG]](https://lh3.googleusercontent.com/blogger_img_proxy/AEn0k_sPDgBWbLIRBaX5-uVaHdmcYhbfsCmzKHOnOlDwGjuVyvSe_kJ_xQVm0rrXabgdoG_u69siUA3XXjH82PGkNeVFYJ01vWZFoCh-nhPmEv8QLvmEYCJ_bvjSLzHUUTjfvur3xu6vDFN6w0qZZRSpgSsO1mk6AMPT7tBRimzLMZ54Jqs0CoY8cG7uQtUiRrH9uyEoTwwYRgadKODB=s0-d)
next up i really layed into it and cranked 'er up to 200amps and setup some 1/4" plate on 1/4" angle. i was probably mostly 1/2 to 2/3 pedal though so wasn't using the full monte and the torch got H O T for sure, smoking a little bit even ,here & there:
![[IMG]](https://lh3.googleusercontent.com/blogger_img_proxy/AEn0k_tsPMv1c9tBiYcM5iG2BmIrn-F7LdoGakPT4VvyzehvUGDWn2v15TmlWgh4PfcIB3Gb8Vo8Yb5XasD9coCL5hFin7UFvtmfk6UWmuoqw1XByeV7ntT1aqzdUwQuYje5iGlpsZkanmWXqL4GL9Rpb5LxDbAZQCnJElkiTY1X64c6SRyYjCkqxhAxffowNqomTpmij5YDeFbCjt0=s0-d)
you can see where i dip'd a few times, and i didn't prep the 1/4" AT ALL, full mill-scale. i was also welding with the garage wide open and not caring much about shielding gas dispursement, hence the pock marks in spots:
![[IMG]](https://lh3.googleusercontent.com/blogger_img_proxy/AEn0k_vDY5c9IZMOMIeMsqhZnzjxkNsYQ61SiZ3-gPqrq0sGKIYqURxkfgRZNWQBXDz-BuuYOPkaODMGPh5RW9G3wSx-kF-Vg-lpiK6SDHOSmsOWsdUhrpdAxMDoOPIHkAfpA3A4X6JRUOURunLgaFThO3Q19Ftjxr_VgxAcNtoV5qxK6nIQbQxB1QDxZAAiSfR1Er-kn6LclStp2Dg=s0-d)
so there you have my review after about 6hrs on the machine. so far so good. my AC is actually MUCH better than the ugly DC results above, but what good is a welder if he can't do both? i'll keep practicing. so far, i like this machine alot, it'll never replace my MIG for DC but it's a great machine all around.
![[IMG]](https://lh3.googleusercontent.com/blogger_img_proxy/AEn0k_vL6uDAeroTJfUc8AYz4uPV-eK9vcKR-o1wlXc1c6nAALDlRZ3eUSR_HvMa3z55y7qFljjZxe-3fPIojWF8vRtqeTu9AvCkE0Vslx-TesVB2AH4DA4RLLCeRyjPoTGQEcgMhBde2iSc2pBBzMHK2bPlrTI9YazWTXsWS0blvalfBA65G8Adon5cvFNGrXZaFrAFMnt9lMbByQ2Y=s0-d)
so here's some pics of my boogers after a 120cu/ft bottle of argon; ~ 1.5 tungstens and about 6hrs run-time.
i know it's not good, but it's my experience after 20+ yrs MIG and stick welding and never picking up a TIG machine before. i think at the end of the next bottle i'll be much happier with the results. and i'm going to pick up some stainless too, that's where the pretty welds reside.
here's a 3/32 - 1/8" gap i filled in some mild steel of different thickness, 1/8 on top of some 3/16". you can see where i undercut the hell out of the 1/8":
definitely NOT stacking dimes, but i'd put it in service:
next up i really layed into it and cranked 'er up to 200amps and setup some 1/4" plate on 1/4" angle. i was probably mostly 1/2 to 2/3 pedal though so wasn't using the full monte and the torch got H O T for sure, smoking a little bit even ,here & there:
you can see where i dip'd a few times, and i didn't prep the 1/4" AT ALL, full mill-scale. i was also welding with the garage wide open and not caring much about shielding gas dispursement, hence the pock marks in spots:
so there you have my review after about 6hrs on the machine. so far so good. my AC is actually MUCH better than the ugly DC results above, but what good is a welder if he can't do both? i'll keep practicing. so far, i like this machine alot, it'll never replace my MIG for DC but it's a great machine all around.
Monday, September 14, 2015
The UGLY Car!
Its BACK! Haven't had the Ugly Car for quite awhile since we've been
moving and otherwise occupied, but it got dropped off a couple of weeks
ago and it'll be sticking around for the winter since I now have a place
to store it.
Been havin lotsa fun with it. Even took the boys camping with it!
![[IMG]](https://dorkpunch.smugmug.com/Other/Ugly-Car/i-cwjhCHK/0/L/20150821_200438-L.jpg)
Sorry to put you through that... They're a little strange and my hair's a little long at the moment...
![[IMG]](https://dorkpunch.smugmug.com/Other/Ugly-Car/i-sqF3qZN/0/L/20150821_202700-L.jpg)
Can you see it?
![[IMG]](https://dorkpunch.smugmug.com/Other/Ugly-Car/i-kz9zmv3/0/L/20150822_073540-L.jpg)
Seems like the brakes on the passenger side are not working as good as they should. The drivers real locks up easy, the drivers front will lock up as well, but no skid marks (gravel driveway) on the passenger side. It doesn't pull at all when I'm driving down the road, maybe I'm just crazy? Reason for the curiosity is the "brake warning" light thingy in the dash started to come on when I step on the brake pedal. Any suggestions!?
Oh yeah, and it died on me last week. It was starting to cut out when it was cold, then on Saturday it just quit. Would kinda pop and sputter but wouldn't run. Got to looking and decided I didn't have (good) spark. Swapped the points and condenser with the new spared Dad had left in the trunk and it runs great again.
Been havin lotsa fun with it. Even took the boys camping with it!
Sorry to put you through that... They're a little strange and my hair's a little long at the moment...
Can you see it?
Seems like the brakes on the passenger side are not working as good as they should. The drivers real locks up easy, the drivers front will lock up as well, but no skid marks (gravel driveway) on the passenger side. It doesn't pull at all when I'm driving down the road, maybe I'm just crazy? Reason for the curiosity is the "brake warning" light thingy in the dash started to come on when I step on the brake pedal. Any suggestions!?
Oh yeah, and it died on me last week. It was starting to cut out when it was cold, then on Saturday it just quit. Would kinda pop and sputter but wouldn't run. Got to looking and decided I didn't have (good) spark. Swapped the points and condenser with the new spared Dad had left in the trunk and it runs great again.
Sunday, September 13, 2015
Precious Metal, the phoenix from the ashes!

So I don't follow sports. At all. Not even the gear head "sports"- Nascar, MX, etc. Don't get me wrong, I love the science and engineering behind all of it, but I just don't have time for that sort of thing. That was, until last year. I discovered the Reno Air Races through the coolest bird I've ever seen- a highly modified P-51 Mustang.
They had a pretty good run last year. This year, only a few hours from their home base in Florida, the plane caught fire on the ground at a fueling stop.

At first, it sounded like the goose was cooked. The cost involved with getting her back in the air was astronomical. However, it seems I wasn't alone in my love for this plane- there was a tremendous outpouring of offered help. Thom Richard, the pilot, retracted his statement about the days of Precious Metal being over, and issued this statement:
"Dear Race Fans,
Precious Metal is more than an airplane; she's larger than life. You have all proven it since our ground fire incident mere hours ago. The groundswell of support is humbling. So what are our options? We could throw in the towel and move on from this tragic chapter and leave the world wondering what could have been.
Or...
We could, in true Team Precious Metal fashion, NEVER GIVE UP! Precious Metal does not deserve to be parted out and disappear into the history books as a failed attempt at the World's Fastest Motor Sport. She deserves to rise out of the ashes in true Phoenix fashion and prove her worth!
Everything is repairable; it's all a matter of capital. If we can raise the necessary funding to make this happen, she will race again!
Many things have to be repaired: wings, fuselage, engine, systems, cowling and last, but not least, her famous paint scheme. The Precious Metal program is run on countless hours of dedicated volunteers and a shoestring budget. This most recent set back is too much of a financial burden for the program to handle. As we know, a setback is just a setup for a comeback. Which brings us to our proposed solution. Here's Team Precious Metal's offer to you, our fans and supporters:
We will give you one square inch on Precious Metal for a donation of $50 towards our rebuild. We will fly your picture around the course embedded in our new paint scheme and you can be part of resurrecting one of the most iconic race planes is history.
Team Precious Metal will be in Reno this year. We will have our pit and sell our team gear. Chances are we'll provide some evening entertainment as well. Come see us there and purchase your squares!
There are several ways to support our cause: through our Precious Metal gear sales, our newly invented onboard picture program, or by supporting our sponsors and purchasing their products.
There's no limit as to how many square inches you can purchase, we'll just make your picture larger! Or submit pictures of friends, family, pets or whatever you desire. Precious Metal is the people's racer. And with your support she will growl around the course again!
Make your mark in air racing history here:
US fans: https://squareup.com/market/AirRaceTeam
Foreign fans: http://warbirdadventures.com/inc/sdetail/160/3086
On a personal note, air racing has been the most rewarding experience I have ever had. Not in the form of trophies and bragging rights, but in the form of enthusiasm, excitement and dedication of the fans and crewmembers. It's been a magical life experience, which I've been very fortunate to be a part of. We, as a team, will do whatever it takes to keep the dream alive. Please join us in making history and carrying on the legacy of the World's Fastest Motor Sport!
Thank you for making it possible,
Thom Richard"
I'm writing this in hopes to see this incredible plane back in the air again. Do your part, help out if you can! Hoping for blue skies again for Precious Metal!
They have also set up a gofundme campaign here: http://www.gofundme.com/dg4s583w
This Old House #6: Excavating for Hidden Treasures.
Yesterdays project- excavating some of the ruins that occur when you
move... We started moving stuff from the storage room over to the
"library" room they had emptied out. Most of it was irrelevant junk not
commonly needed that we probably should have just tossed. We moved
maybe a load or two a month for several months, and then when we moved
officially the room got stuffed full with everything we just wanted out
of the way for a while.
I didn't take a proper before picture, so here are some half way through pics. Stupid chandelier lights make it really hard to get a good pic.
![[IMG]](https://dorkpunch.smugmug.com/Other/This-old-house-/i-LfVv2N9/0/XL/20150912_104801-XL.jpg)
The whole center area was stacked up with totes, bathroom stuff, and clothes / blankets in garbage bags.
![[IMG]](https://dorkpunch.smugmug.com/Other/This-old-house-/i-GZKcbnV/0/XL/20150912_104955-XL.jpg)
![[IMG]](https://dorkpunch.smugmug.com/Other/This-old-house-/i-vRSSxpQ/0/XL/20150912_105003-XL.jpg)
I relocated a bunch of the long term storage stuff into a closet, got the bathroom type stuff put up in the laundry room storage, and the board games moved to their new home in the built in cabinet downstairs. The rest of it got re-stacked and a little more organized.
There was a built in bookcase right here, so there wasnt any carpet. You can see more wood floor. I think the wood floor upstairs is going to be REALLY rough when we eventually rip up the carpets. Can feel all sorts of wonky things through the carpet.
![[IMG]](https://dorkpunch.smugmug.com/Other/This-old-house-/i-8m5Jh3x/0/XL/20150912_110922-XL.jpg)
And that brings us to our next Hidden Treasure.
This little stove was left behind. Aside from the little electric heater built into the bathroom ceiling, this is the only "permanent" heater upstairs.
![[IMG]](https://dorkpunch.smugmug.com/Other/This-old-house-/i-FQR4Zgq/0/XL/20150912_113337-XL.jpg)
It's a 112 Oak model, made by the Peninsular Stove Co.
![[IMG]](https://dorkpunch.smugmug.com/Other/This-old-house-/i-r2hrgjJ/0/XL/20150912_113348-XL.jpg)
![[IMG]](https://dorkpunch.smugmug.com/Other/This-old-house-/i-nRv8TrB/0/XL/20150912_113406-XL.jpg)
![[IMG]](https://dorkpunch.smugmug.com/Other/This-old-house-/i-tnv5r28/0/XL/20150912_113429-XL.jpg)
![[IMG]](https://dorkpunch.smugmug.com/Other/This-old-house-/i-3Jdf3LF/0/XL/20150912_113440-XL.jpg)
![[IMG]](https://dorkpunch.smugmug.com/Other/This-old-house-/i-ZjvXqJm/0/L/20150912_114728-L.jpg)
Neat little stove that appears to be in great shape. No proof for sure but from what I could find on the internet it was probably built around 1920. Don't know that it'll put out much heat but we'll give it a try and see how well it works. Chimney may have some issues too, its a little to short apparently, and sometimes doesn't get the best draw.
Finished with the library for now.
![[IMG]](https://dorkpunch.smugmug.com/Other/This-old-house-/i-h887g52/0/XL/20150912_115846-XL.jpg)
![[IMG]](https://dorkpunch.smugmug.com/Other/This-old-house-/i-cddQPcf/0/XL/20150912_115901-XL.jpg)
Stove's all dug out and "useable".
![[IMG]](https://dorkpunch.smugmug.com/Other/This-old-house-/i-vLRnGhV/0/XL/20150912_115930-XL.jpg)
Trying to decide what to do with these ginormous book shelves.
![[IMG]](https://dorkpunch.smugmug.com/Other/This-old-house-/i-GqnPDfb/0/L/20150912_115948-L.jpg)
And here's a little sneak peak at a future Hidden Treasure report- The table was also left behind... Solid would and weighs a LOT.
![[IMG]](https://dorkpunch.smugmug.com/Other/This-old-house-/i-TrRXBng/0/XL/20150912_115912-XL.jpg)
Managed to get all this done Sat. morning, and still had time to get a couple of paying jobs done in the shop and have a wiener roast in the fire pit last night!
I didn't take a proper before picture, so here are some half way through pics. Stupid chandelier lights make it really hard to get a good pic.
The whole center area was stacked up with totes, bathroom stuff, and clothes / blankets in garbage bags.
I relocated a bunch of the long term storage stuff into a closet, got the bathroom type stuff put up in the laundry room storage, and the board games moved to their new home in the built in cabinet downstairs. The rest of it got re-stacked and a little more organized.
There was a built in bookcase right here, so there wasnt any carpet. You can see more wood floor. I think the wood floor upstairs is going to be REALLY rough when we eventually rip up the carpets. Can feel all sorts of wonky things through the carpet.
And that brings us to our next Hidden Treasure.
This little stove was left behind. Aside from the little electric heater built into the bathroom ceiling, this is the only "permanent" heater upstairs.
It's a 112 Oak model, made by the Peninsular Stove Co.
Neat little stove that appears to be in great shape. No proof for sure but from what I could find on the internet it was probably built around 1920. Don't know that it'll put out much heat but we'll give it a try and see how well it works. Chimney may have some issues too, its a little to short apparently, and sometimes doesn't get the best draw.
Finished with the library for now.
Stove's all dug out and "useable".
Trying to decide what to do with these ginormous book shelves.
And here's a little sneak peak at a future Hidden Treasure report- The table was also left behind... Solid would and weighs a LOT.
Managed to get all this done Sat. morning, and still had time to get a couple of paying jobs done in the shop and have a wiener roast in the fire pit last night!
Monday, September 07, 2015
This Old House #5: Labour Day and Wood Floors.
Labour day and we be labourin. Here's the front room- our first project. Some before pics:
![[IMG]](https://dorkpunch.smugmug.com/Other/This-old-house-/i-Zqg2Lcp/0/XL/20150813_163608-XL.jpg)
![[IMG]](https://dorkpunch.smugmug.com/Other/This-old-house-/i-f6F3jzc/0/XL/20150813_163554-XL.jpg)
![[IMG]](https://dorkpunch.smugmug.com/Other/This-old-house-/i-PLzmjFh/0/XL/20150813_163655-XL.jpg)
The trim, while it looks really cool, is NOT actually a wood grain. It was all hand painted with a roller to look like wood grain. I like it a lot, but after some discussion it needs to go. The trim will be white to brighten in up a bit and add some contrast to the wood floors under the carpet. We'll keep the yellow for now. Spent the day sanding and painting. Still have to tape and paint all the little edges everywhere, but its starting to look good.
![[IMG]](https://dorkpunch.smugmug.com/Other/This-old-house-/i-zbg7ckX/0/XL/20150907_184437-XL.jpg)
Peeled back some more of the carpet. We had pulled a little corner back and were excited by what we saw- floor looked to be in pretty good shape. Of course, you KNOW it couldn't be that simple... Right!?
![[IMG]](https://dorkpunch.smugmug.com/Other/This-old-house-/i-Pk4ps6M/0/XL/20150907_181219-XL.jpg)
![[IMG]](https://dorkpunch.smugmug.com/Other/This-old-house-/i-FqRZ8tQ/0/XL/20150907_184504-XL.jpg)
Yeah, the wire there by the door... Not too impressed with that.
Haven't talked with Mrs. Punch yet, but the carpet will probably get rolled back in place while we finish the painting in here and then redo the dining room. The floor is definitely salvageable, but its going to take some elbow grease. I think it would be best to get the dining room done and any other room downstairs that we plan on having as a wood floor, so we can rip all the carpet out at the same time and sand / seal / stain / whatever we decide on the floors all at once.
Suggestions?
The trim, while it looks really cool, is NOT actually a wood grain. It was all hand painted with a roller to look like wood grain. I like it a lot, but after some discussion it needs to go. The trim will be white to brighten in up a bit and add some contrast to the wood floors under the carpet. We'll keep the yellow for now. Spent the day sanding and painting. Still have to tape and paint all the little edges everywhere, but its starting to look good.
Peeled back some more of the carpet. We had pulled a little corner back and were excited by what we saw- floor looked to be in pretty good shape. Of course, you KNOW it couldn't be that simple... Right!?
Yeah, the wire there by the door... Not too impressed with that.
Haven't talked with Mrs. Punch yet, but the carpet will probably get rolled back in place while we finish the painting in here and then redo the dining room. The floor is definitely salvageable, but its going to take some elbow grease. I think it would be best to get the dining room done and any other room downstairs that we plan on having as a wood floor, so we can rip all the carpet out at the same time and sand / seal / stain / whatever we decide on the floors all at once.
Suggestions?
Sunday, September 06, 2015
"It doesn't matter what you make, and it doesn't matter why. The importance is that you are making SOMETHING."

Love this. Wife and I were talking about something the other day that made me remember this post I had started a long time ago. We like to think we've done okay for ourselves. Our conversation basically boiled down to the wondering why we were relatively "stable" in our lives. What we decided is that because we know how to "make", create, build, DO- we've been able to save ourselves a LOT of money. I was looking at a diagram the other day that showed what basic repairs on an average vehicle would cost. This isn't the same diagram but you get the idea:

FOUR HUNDRED AND SIXTY THREE DOLLARS!?!?! For an ALTERNATOR?! Holy cow. The alternator all by itself is usually less than a hundred bucks, and unless you're working on a foreign car they aren't that hard to change. I just replaced the starter in Mrs. Punches car. Took maybe an hour, and the starter itself cost something like $65. Not to mention we purchased the car for under $1,000 in need of some work, with low miles, fixed it, and have put almost 70k miles on it in the last 5 years.
Moral of the story- everyone, man-woman-or child- should now how to weld and sew, and everything in between.
Thursday, September 03, 2015
This Old House #4: Deep, Dark, Dungeons!
Okey Dokey.Believe it or not, this one of my favourite parts of this house. Creepy things are behind this door...
![[IMG]](https://dorkpunch.smugmug.com/Other/This-old-house-/i-fcSszQD/0/XL/20150903_195302-XL.jpg)
Don't mind the mess in the kitchen. We haven't really unpacked as the plan is to (hopefully) have all new cabinets installed in the next couple of months. Anyways, lets head downstairs.
![[IMG]](https://dorkpunch.smugmug.com/Other/This-old-house-/i-9LJDCWL/0/XL/20150903_195314-XL.jpg)
Yup. Thats dirt. Kinda neat how you can see the different layers as it goes down,
![[IMG]](https://dorkpunch.smugmug.com/Other/This-old-house-/i-6xcLkQP/0/L/20150903_195353-L.jpg)
And if you look close you can even see the grass / roots from what is probably the virgin desert sod.
![[IMG]](https://dorkpunch.smugmug.com/Other/This-old-house-/i-j7ZMddh/0/XL/20150903_195435-XL.jpg)
Apparently there used to be a boiler in the second floor as well as the basement- well, here's the remains of the boiler that used to be in the basement. This was not its original location. Not sure why it's partially cut up- but my guess is someone attempted to get it out of the basement, got it partially cut up, ran out of steam and just dragged the rest of the shell into this corner.
![[IMG]](https://dorkpunch.smugmug.com/Other/This-old-house-/i-Dhx8KD4/0/XL/20150903_195338-XL.jpg)
Remnants of knob and tube wiring. None of it's currently hooked up. Don' think there's even any wire left, just a few of the knobs.
![[IMG]](https://dorkpunch.smugmug.com/Other/This-old-house-/i-VcMBbVp/0/XL/20150903_195402-XL.jpg)
Crawlspace under the front living room. Bricks are holding up a pipe that is supporting the floor joists. I believe this was an attempt at making the floors less saggy / creaky, and a successful one at that. Home inspector was impressed with how "solid" feeling the floors were. If I remember correctly, Bishop Adams helped put this and a few others up. Fitting- he sure put up a lot of support to everyone around him in his life, and I'm proud to have a reminder of him here.
![[IMG]](https://dorkpunch.smugmug.com/Other/This-old-house-/i-Hrwxc9q/0/XL/20150903_195427-XL.jpg)
Here's the utility room. Not too big. I was thinking it would be a great spot to set up an indoor pistol shooting range shooting into the dirt, but wife wasn't too keen on that idea.
![[IMG]](https://dorkpunch.smugmug.com/Other/This-old-house-/i-CKJ7cTs/0/XL/20150903_195412-XL.jpg)
The brick mixed in with the lava block is the base of a currently extinct chimney. Don't know how far up this one goes.
Some interesting wiring here.
![[IMG]](https://dorkpunch.smugmug.com/Other/This-old-house-/i-psJnHzF/0/XL/20150903_195444-XL.jpg)
The only ventilation in the basement comes from this window.
![[IMG]](https://dorkpunch.smugmug.com/Other/This-old-house-/i-wMBPwPK/0/XL/20150903_195454-XL.jpg)
Furnace isn't too old, and the water softener is maybe 2? years old.
![[IMG]](https://dorkpunch.smugmug.com/Other/This-old-house-/i-9934VvZ/0/XL/20150903_195501-XL.jpg)
I just love the lava block foundation.
![[IMG]](https://dorkpunch.smugmug.com/Other/This-old-house-/i-z6MG5VH/0/XL/20150903_195518-XL.jpg)
Rough cut floor joists and underside of the wood flooring. I believe its Red Pine?
![[IMG]](https://dorkpunch.smugmug.com/Other/This-old-house-/i-g2jzqGV/0/XL/20150903_195531-XL.jpg)
Old plumbing that may have gone to an extra sink when it was an appartment? Also another chimney base in the foundation. This one goes all the way out, and the pot bellied stove in the upstairs library is connected to it. Going to give that one a try this winter.
![[IMG]](https://dorkpunch.smugmug.com/Other/This-old-house-/i-wn2HnsR/0/XL/20150903_195555-XL.jpg)
Fun fun! Need to start researching vapor barriers. Soooo many things to do.
Don't mind the mess in the kitchen. We haven't really unpacked as the plan is to (hopefully) have all new cabinets installed in the next couple of months. Anyways, lets head downstairs.
Yup. Thats dirt. Kinda neat how you can see the different layers as it goes down,
And if you look close you can even see the grass / roots from what is probably the virgin desert sod.
Apparently there used to be a boiler in the second floor as well as the basement- well, here's the remains of the boiler that used to be in the basement. This was not its original location. Not sure why it's partially cut up- but my guess is someone attempted to get it out of the basement, got it partially cut up, ran out of steam and just dragged the rest of the shell into this corner.
Remnants of knob and tube wiring. None of it's currently hooked up. Don' think there's even any wire left, just a few of the knobs.
Crawlspace under the front living room. Bricks are holding up a pipe that is supporting the floor joists. I believe this was an attempt at making the floors less saggy / creaky, and a successful one at that. Home inspector was impressed with how "solid" feeling the floors were. If I remember correctly, Bishop Adams helped put this and a few others up. Fitting- he sure put up a lot of support to everyone around him in his life, and I'm proud to have a reminder of him here.
Here's the utility room. Not too big. I was thinking it would be a great spot to set up an indoor pistol shooting range shooting into the dirt, but wife wasn't too keen on that idea.
The brick mixed in with the lava block is the base of a currently extinct chimney. Don't know how far up this one goes.
Some interesting wiring here.
The only ventilation in the basement comes from this window.
Furnace isn't too old, and the water softener is maybe 2? years old.
I just love the lava block foundation.
Rough cut floor joists and underside of the wood flooring. I believe its Red Pine?
Old plumbing that may have gone to an extra sink when it was an appartment? Also another chimney base in the foundation. This one goes all the way out, and the pot bellied stove in the upstairs library is connected to it. Going to give that one a try this winter.
Fun fun! Need to start researching vapor barriers. Soooo many things to do.
Subscribe to:
Posts (Atom)