title

Motorcycles, tools, and garages! A little bit of everything mechanical and technical.

Showing posts with label Small Engine. Show all posts

Thursday, November 05, 2015

Hot Rod Scooter.

One of our secretaries had her feet operated on and got this cool little scooter. She left it behind one evening, so I customized it for her...

[​IMG]

[​IMG]

Of course, it wouldn't be custom without the cardboard clothespinned to the frame for the *frrrrrrrrrrrrrttttt* noises!

[​IMG]

Sunday, September 20, 2015

dorkpunch engines #3: Boring the cylinder.

I had some time to kill at the shop while waiting for my wife. She said she would be over in half an hour, which of course means 2 hours. She even ran a little late so it was more like 2 and half so I was able to knock some holes in some aluminum.

1/8" pilot holes, 3" deep through the cylinder. The two for the valves are the finished diameter for the valve guides. The cylinder has a long ways to go... 7/8" more to be exact.


To drill them I had to use a big 'ole aircraft drill. Started with a normal drill bit, got as deep as it could go, then switched to this long one. Figured there was less chance of the holes going crooked on me.


Makin' chips.


Makin' BIG chips...


and big messes.


"Finished" cylinder. The drill bit is obviously a bit rough, so I plan to hone it with a brake master hone and then match the piston to the finished bore.


Because of the vice I was using, I couldn't drill all the way through. This is not a problem though, because I still need to machine off about 1/4" to get it down to the stroke I want.


Bottom.


Will hopefully start doing some figuring on where the valve ports need to go and the final diameter of the valve heads.

Thinking I should have left the bore a tad smaller- its pretty close to some of head bolt holes. Won't have a lot of gasket area in those two spots.

Live and learn...

Thursday, June 25, 2015

I ain't dead yet...

"Just, very, horribly burned..."

No, not burned, but between the bolt of lightning and the sheet of plywood flying down the freeway in front of me I'm beggining to wonder if my days aren't numbered...

So here's the skinny.  Schools out.  I survived the 8th grade Cali trip, barely.  The house is sort of caught back up.  I've taken a "part time" job subcontracting small engine repair for ACE Hardware in addition to all of the other small engine repair jobs I've been putting off until school got out.  We are pushing our house hard- our "new" house is now vacant and we are taking care of the yard etc until we can get our house sold.  Can't wait to get over there!  Lots been going on, lots of things I plan on posting so stay tuned. 

In the meantime, here's whats going down in the dorkpunch garage:


And that's just the little stuff!

Monday, June 01, 2015

More Old School Greene.

Time for some more greene. We've been having a LOT of rain lately- nothing like Texas at the moment but for Idaho, LOTS. After 2 weeks of wet I finally had the chance to cut grass. My grass clipping pile is over flowing, so I decided to go old school- dug out the '65 110. Love this thing! It always fires right up and cuts pretty darn good.

Had to drive it a few hundred yards from the "shop" to my yard, and on the way I stopped to check on a neighbor who's been in the hospital and has grass over a foot tall. Doesn't sound like he's going to be able to do much for a while, so I put all 8 ponies to work knocking down his rather large lawn. Any excuse for more seat time, right!?


Finally made it to my yard and man- for 50 years old this thing does a GREAT job. There's just something about sitting on that steel seat, having to pull levers and push buttons and clang gears. Slow, but fun. SMoooootthhhh cut too.


Old mower has come a long ways- used to not be able to mow more than 15 minutes without having to stop and drain the rust from the sediment bowl or for something else breaking down. I used it for well over 2 hours and it didn't miss a beat. 
 
So after all that mowing, I figured I should give the old thing some attention. Pulled the deck off and commenced cleaning.


Lots of yuck, top and bottom.


Discovered the tensioner pulley pivot was siezed. Managed to break it loose and also managed to break the spring that pulls the belt tight... . Not a reall big deal because I've got a spare.

Pressure washed the deck off.


Decided to try something out. Probably should have spent some time knocking the rust off but I want to see how well this Rustoleum holds up to the abuse and over the rust.


Blades sharpened and back on. I know, I didn't do it right... Running out of time at this point.


Got the deck all buttoned back up and ready to mount but had to leave so I thought I was done for the night. Ended up getting back early enough to finish a few things up!


No pic, but I finally got the governor and throttle cable adjusted right so it will actually idle now instead of run at a constant 3,200 rpm's.

Also got this rat-nest figured out. No idea what they were thinking but it was wired in the weirdest way possible- the charging circuit was hooked in to the coil so it was powered even when the key was off, the starter was hooked up to something else, just everything was backwards.


ShaZAM!!! All buttoned up.


So now it will start, and more importantly STOP, with the key switch and I don't have to unplug the coil every time I'm done mowing. The throttle works, so's I can idle it down or rev it up. Blades are sharp, tensioners working so's the blades don't slow down when it runs into thicker grass.


Few things still to do though: Need to address the leaky carb and adjust the stiff clutch pedal.

Thursday, February 12, 2015

dorkpunch Engines #1. (re) Learning how to machine.

So I stumbled across this video a while ago.


I've been wanting to try my hand at making some type of miniature model engine for a long time now. I have seen dozens of these cool videos- in fact, here are two more.


I've built a couple of really simple air engines, and even use the one as a project for my Grade 8 students to build.  Here was my first attempt ever at building an engine. This was my test bed for the above engine- basically copied but simplified from one I found on Instructables.


I adapted that one to this one- VERY simple to make and pretty easy to get running decently. ZERO machining- all done on a drill press or with hand tools. Little bit of welding but it could be done without it if you had different chunks of metal.

From this:


To this:


Back to the topic at hand.  I've got my own idea I've been kicking around for a while- flathead with an atmospheric intake valve, 1" bore and I'm thinking either 1.25 or 1.5" stroke. Not sure how I'm going to do the governor but I've got a few ideas. No idea how well it will work, if it ever even DOES. I don't have a real great track record at finishing projects...

Been working on dumping the ideas swirling around in my head out onto paper and the computer.

Here's the general idea.


Currently thinking flathead, with atmospheric intake valve. Main design constraints are the limiting factors of the tools I have, so the goal is to make it as simple as possible and entirely built on the tools I have access to- a Smith 1250xl (?) lathe / mill combo. Been playing around a bit and have made some shavings, will get more pics posted. 

Sunday, August 11, 2013

Going Green. JOHN DEERE green!

I am soooo slow at getting my own projects done.  Last year, a lady approached me about her dead lawn tractors.  She was in need of a riding mower, and wondered if I would be willing to fix one, taking the other as payment.  Only one of them was even close to having all of the parts, and even then it was pretty rough.  This post starts waaaayyy back then when I picked up her mower.  I won't dwell on the assembly of the 110.  I started working on the 314 last week, so these pics came from about a 3 day period.

Here's the 110 I put together for her.  Before:

  
 And AFTER.  Looks purty good, eh?


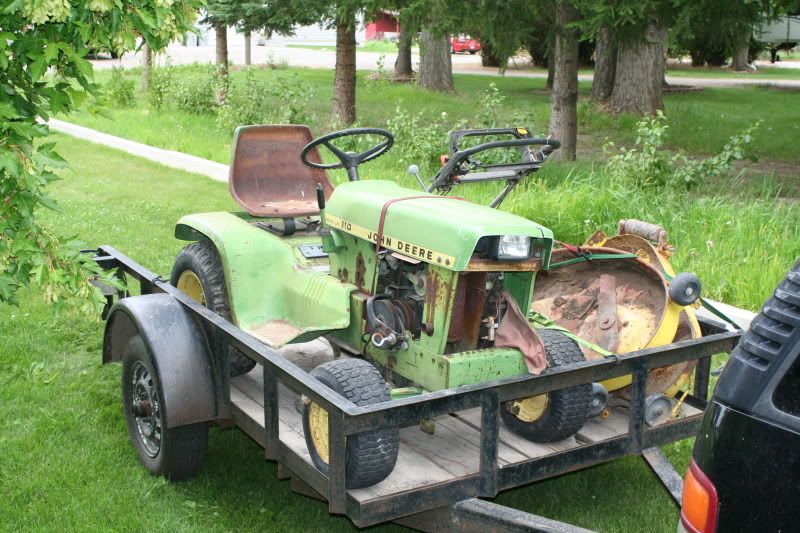
And this is what I took in payment.

Yeah I know.


Seems to be in decent shape, other than the busted steering wheel, ignition switch that got cut out, and missing seat foam. Front tires have some slow leaks. I have the rest of the sheet metal for it. Currently trying to figure out the no-spark issue but I'm fairly certain its got a bad coil.

The biggest issue is that the tractor is all I have- no deck, tiller, blower, blade, nuthin.
Spent some time puttering on the 314, and even got it running!

Thought I had a bad coil- tested a bit off. Borrowed a coil from my '48 Dodge, and it tested sorta okay but I still couldn't get spark. Got to monkeyin around with the points and it seems that they had some sort of film on them- while I was probing with the test light I got a big ZAP all of the sudden at the points, and viola- spark! Hooked the original coil back up, shot some gas in the carb and it fired.

Next step was the fuel system- unhooked the fuel line in a couple of places, ran some fresh gas through the tank and let it drain, then began hooking the lines back up with a new fuel filter until I got fresh gas to the fuel pump. Pulled the carb bowl off and gave it a redneck cleaning, got gas to the carb, put it all together and away she went!

TEST DRIVE!

Huh. It don't move.


Got to looking and discovered this...


The pin from the drive shaft to the transmission was snapped and had been for a long, long time.

Time for a temporary fix so I can see if the trans is okay. If it is, I might be willing to spend some time / money on this thing.

Drilled out the remains of the busted pin, found a bolt, made some bushings out of a roll pin, and cobbled it back together.


Set the seat pan back on, fired it up, and took it for a spin. Note the awesome steering wheel...


Seems to run and drive great. It's a little worn, but I can fix that. If only I could come up with a deck, blower, tiller, blade, etc. etc.

Followed up a couple of leads on attachements, hoping to score a deck, blower, tiller, and maybe a blade and some other small parts from the same guy my brother bought his entire bucket or three of bolts from.

Spent some more time on it this evening and got a few small odds and ends sorted out. Motor is pretty much buttoned up- still need to pick up and air filter and low speed screw for the carb and fix the points wire but other than those things and an oil change in the near future I think it's good to go.

Next step- prettify. Labor is cheap, parts are not. Might have to wait a while on the big parts purchases so for now I'm going to focus on scrubbing it up and getting some fresh John Deere Green paint on 'er.

After her bath.


Cleaned up nice. I'll let it dry overnight and hit it with the wire wheel tomorrow. Hopin to get a little paint on it tomorrow as well. Time will tell.....


Popped the hood off, scuffed it up, wiped it down with acetone, and masked off the decal.


First coat of paint:


After another coat and some drying time.


And a little comparison of the fresh paint vs. the old faded crap.


Lots better, but not perfect. I'm not spending a ton of time on this, I plan on USING the tractor so it's not going to be a garage queen. Just freshening it up. 


Fenders off, bits removed.


Spent about 45 minutes with the wire wheel knocking off loose paint,


Then a quick once over with the sander to smooth things out a bit.


Taped and wiped, ready for paint.


One coat in.


All done!


I worked on a bunch of other things while it was drying, but I'll include this part now. I bought some trailer clearance lights for tail lights- BUT... Anyone see a difference here?


The light on the right has 2 bulbs, the left only has one. They came off the same shelf, were the same price, and the boxes had the same numbers on them Oh well, one side will be brighter than the other.
Installed and wired.


Cleaning up the control tower...


And some paint.


Wire wheeled and painted most of the frame. Kinda pointless, because most of this is hidden underneath the fenders or side covers, but it makes me feel better knowing the rust has been slowed down a little...


Set the fenders back in place...


Fixed the missing ground wire for the headlights, and put the hood back on.


 Grill before:


After:


Installed.


Spent the afternoon wiring up a new ignition switch. Took some figuring but I got most of the cut wires from the old and missing switch figured out. There are 2 left that don't seem to be hooked up to anything, and the tractor will start / run and the electric PTO works fine without 'em so I guess I'll just cap them off for now.


Biggest problem was all of the universal ignition switches I found were too big to fit in the original hole because of the steering column, so I had to find a new spot to mount it. At the same time, I cleaned up the dash a bit and put some new paint on it.

Dash before:


Dash after.


Still have a little cleanup to do on the silver paint. When it's dried for a couple of days I'll hit the plastic with some cleaner and maybe some clear coat. Might even try polishing up the knobs, but thats getting a little too detailed for a beater I plan on using. We'll see.

Slapped a coat or two of paint on the air filter cover...


Side cover before:


Wire wheeled:


Sanded:


Paint.


Installed.


And the other side.


More pics from yesterday.

Ran wires to the light switch, capped the two extra wires, and tidied everything up with zip ties.


Lights!


The middle headlight is burnt out but that's an easy fix.


Two more pics from yesterday. I set the seat pan back on, and found the old foam. It's falling to pieces but you get the idea.


All dressed up with nowhere to go!

This project is probably coming to a close as it is for a while. Other than painting the wheels, the rest of the parts are going to cost $$$, which I don't have at the moment.

On the plus side, I still have a week before school starts up again, and I have a '39 Dodge 1/2 ton that needs some elbow grease.