title

Motorcycles, tools, and garages! A little bit of everything mechanical and technical.

Sunday, December 30, 2012

Ford Blue

One of my all time favorite colors.  In fact, I once painted an entire motorcycle that color.  Plugging away on the "big" project.  I had cleaned up the block a few weeks ago, and am hoping to hone it over the Christmas break.  I had a few minutes and the garage was warm, so I used up the rest of a can of engine paint on one side of the block.

Had to get it nice and warm first...

Photobucket


"Finished", except it needs another coat or two and I didnt do the edges real well because nothing is masked yet.

Photobucket 

Santa brought me a little money to put towards this project, but I'm still a tad short to order the rebuild kit.  Hoping to get a few customers projects out of the way, that will give me some money and time to hopefully get the motor back together before school gets out for summer. 

Christmas was great- spent some good time with family both near and sorta-far, played lots of games, cleaned the house a bazillion times, and reach a book or two.  Managed to scrounge up a nice big chunk of brass and a few other things as well as play with my TIG welder a bit, but more on that later.  Still have a few days to play a few more games, do another puzzle (or, watch my wife do it anyways...) and who know what else.  Back to school on Wednesday, see y'all next year!

Thursday, December 27, 2012

WANT.

Just happened to see this over on mendlemax.com - they released a new version of their 3d printer.


Just think of all of the cool things I could do in my classroom with a 3d printer!  Sure would be cool to send my students home with a physical model of the cars they design and build in Sketchup.  Some day...

More info here:  http://www.mendelmax.com/

Thursday, December 20, 2012

The Infinite Loop...

Sometimes it feels like I start one thing, only to realize I need to do something else to get that thing done.  So I start on that job, only to discover that in order to get it done, I need to do something else.  If I want to get that thing done- you guessed it, I have to get the original project finished.


I'm stuck in an infinite loop right now...  I'm trying to build some radius fingers for my box and pan brake.  Got it all figured out, cut a bunch of pieces of metal out, and decided that if I wanted to be really accurate drilling the holes for the clamp bolts, I oughta build a fixture for the drill press.  No problem- I have a decent size piece of channel to use as a base plate and a few chunks of half in. bar stock to use as a fence.

Radius finger parts:

Photobucket


Parts to make a drilling / welding fixture:

Photobucket

Heck, while I'm at it, why not make it adjustable?  One fence should be able to swing so I can use it as a fixture for welding pieces together at angles... That'd be handy, right?

Turns out my band saw isn't quite big enough to cut the channel.  No problem, just modify it a bit with a grinder.  After several fine "adjustments" with the grinder, it *just* barely cuts without the guide wheels snagging on the metal.  I've been meaning to do this for a while- seems like the saw is just barely too small more often than not.


Photobucket

Photobucket 
 This is where it gets interesting.  I have a (what I thought to be) decent little mill / lathe in the shop.  I figured I could chuck that piece of metal up in there and cut an arc for the adjustable part of the fence.  Before I started teaching the mill was next door in the woods shop because the previous teacher had no interest in it.  Needless to say there was NO tooling for it.   I've picked up some ultra cheap (read:  cheap Harbor Freight crap) to experiment with over the years as I had a little extra money.


Promise not to laugh?


Photobucket 
 There's a decent Smithy vice barely bolted to a H.F. turntable, held precariously to the cross feed with another set of H.F. clamping blocks.  Lets just say this little experiment had less than satisfactory results.  The mill has a LOT of backlash and tends to shake itself out of position in all three axis.  PLUS- turns out the channel I am trying to use for the fixture is WARPED?!

Wait, where was I? Oh yeah, building radius fingers for the brake...

Thursday, December 13, 2012

Dance a little Jig.

When I was maybe 13, my parents got me a rubber band powered airplane kit for Christmas.  It wasn't the one I wanted, but it turned out to be even better.  I wanted a fancy big one that looked like a real airplane.  This thing was a decent size, but only a "silhouette" plane.  Turns out that was a good thing- easy to build, and it flew great!  My friend was jealous of how well it flew compared to his (which, as I recall, he built using contact cement meant for concrete flooring...)

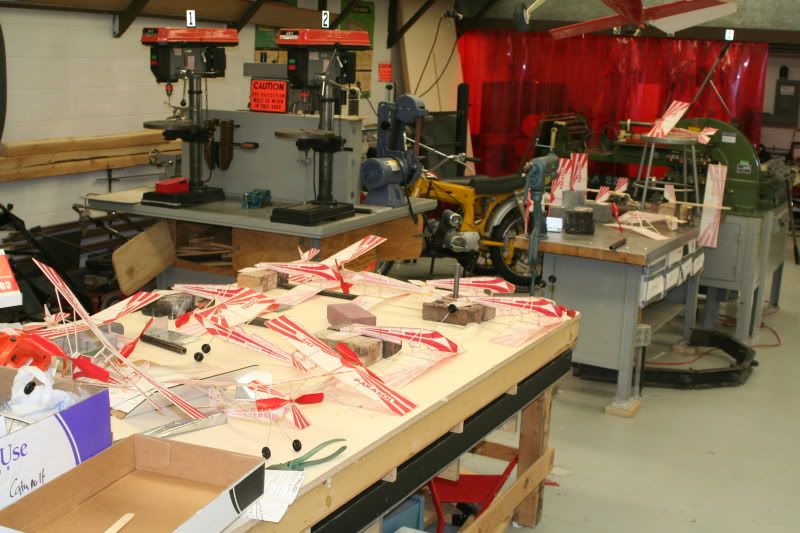
Fast forward 20 years.  My Tech and Design 2 class, according to the class description, builds rubber band powered airplanes.  The kits that were left over were the "Super Delta Dart", so I gave them a shot.  They. Sucked.  Very easy to build, but on average maybe 2 out of 18-20 in a class flew WELL.  They were very flimsy and were always breaking too.  Last year I decided to give that old kit a try, as it is STILL in production!  Made by SIG- called the Parasol.


It worked out great!  Most of the planes flew well, the build is easy, and they are fairly sturdy.  Little more spendy, but well worth it in my opinion.  One problem though-  Gluing the wings together took about 5 minutes and then a full day to set up.  Gluing the tail- same thing.  Gluing the tail to the fuselage- another day.  Annddd... one more day for the wings and struts.  That is a LOT of wasted time.  We used it to our advantage though, studied a bit more on flight, etc, but I wanted to cut the time of this unit way down because of changes to schedules and switching to trimesters.

The OLD way of doing it:
Photobucket


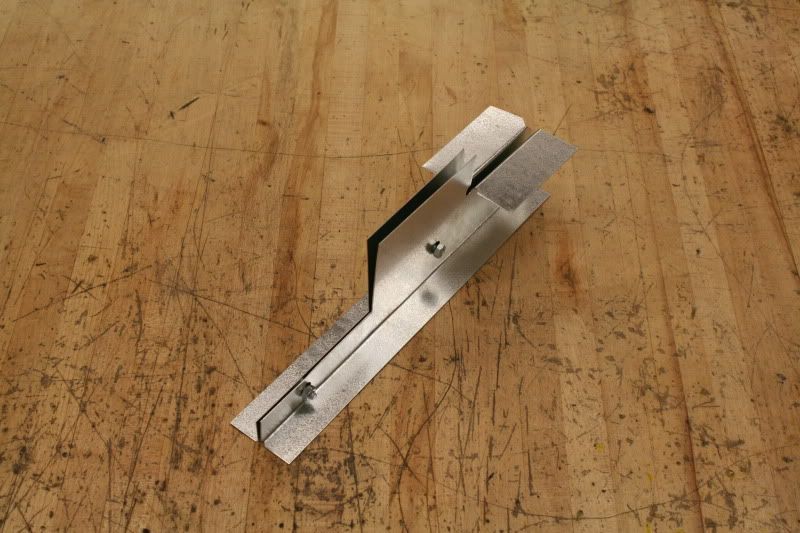
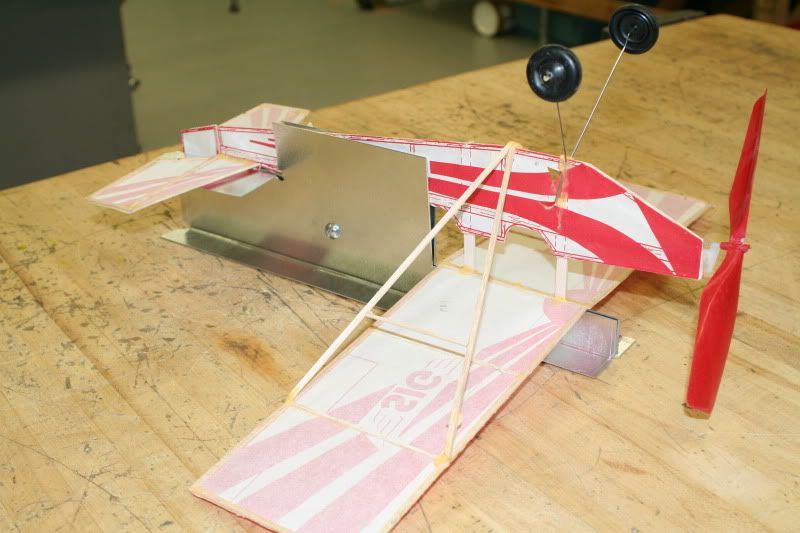
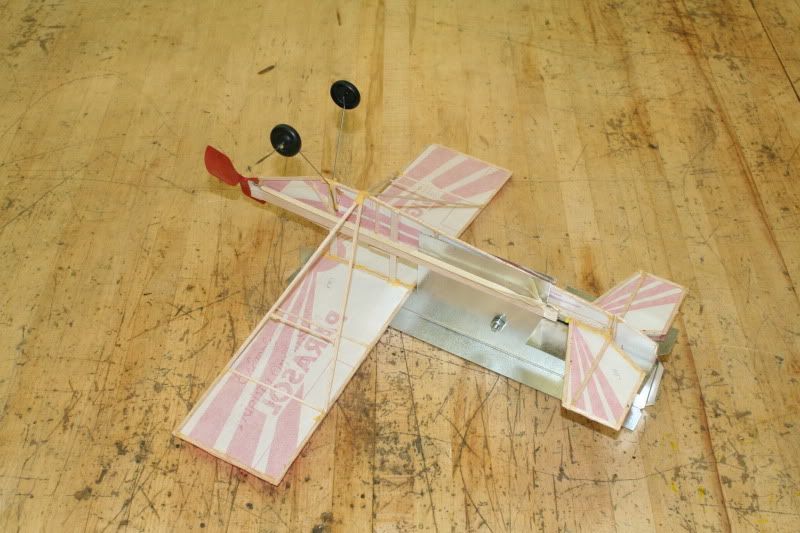
The solution:  Build a jig that will hold all of the completed parts- tail, fuselage, wings, and struts, all at the same time, so they can be glued at once and dry overnight.

Photobucket


Photobucket

Photobucket

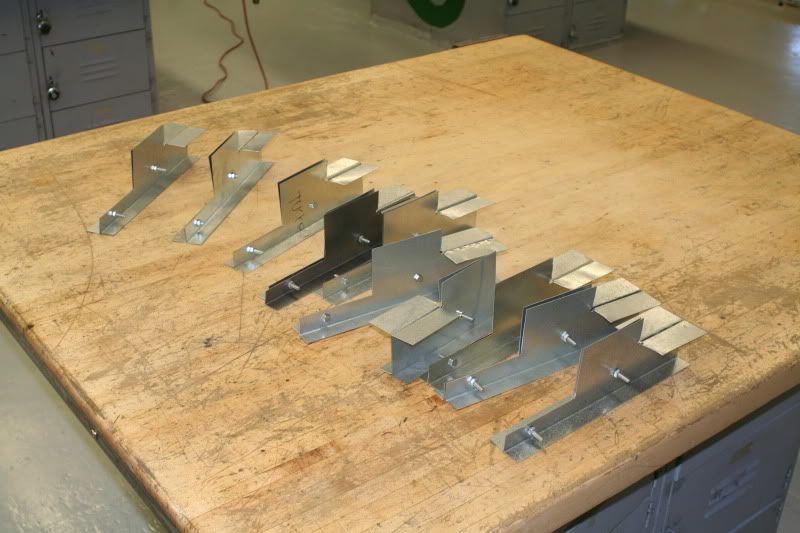
 To top it all off, I had my Metals and Engines 2 class build me a truckload of them as a review of metal working.  Now I have 12 jigs, should make things go pretty quick!

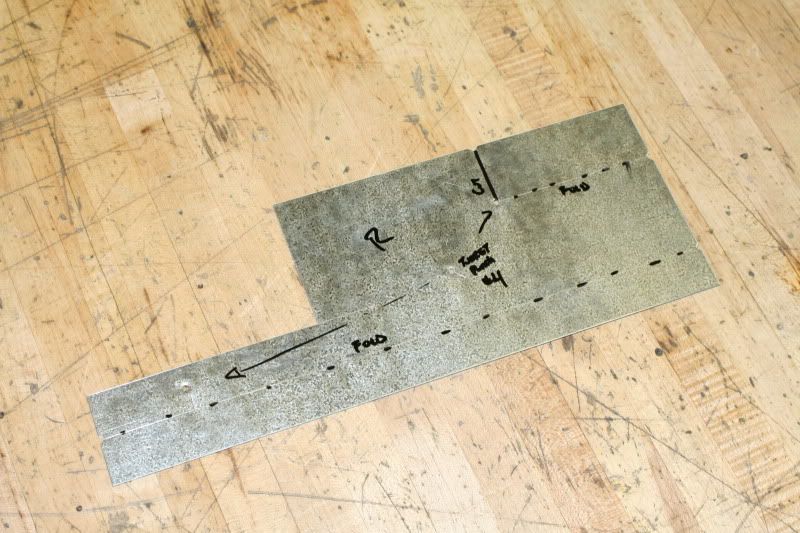
Pattern for the jigs:
Photobucket

Gobs done, just need some planes to glue up!
Photobucket z

Wednesday, December 12, 2012

Cranken 'em out.

Don't think my poor cheap band saw has had this much use in, well, ever.


Photobucket


Cutting parts for the air engine we're making in my Metals and Engines 2 class.  Showed the kids how to use it and they are keeping it busy while tearing this thing apart:


Photobucket


Give 'em some tools and stand back!  It was an old Riso photocopier the school was going to haul to the dump.  I'm scavenging some parts out of it and scrapping the rest.  Have a couple of stepper motors, misc. belts and shafts, gears, switches, wire, and about 20 lbs of screws.

Photobucket

Hoping to eventually turn it into a 3D printer, although if (when) I make the printer, I'll probably end up getting the right (new) parts.  If only I had the $$$.

Saturday, December 08, 2012

FIRST Lego League 2012- Senior Solutions

Today was the Pocatello Qualifier for our FLL robotics teams.  I had two teams again this year- one of 7th and one of 8th graders.  It's been a looonnnggg couple of months prepping for this- most of which felt like I was talking to myself, but as usual, the teams managed to really pull it together in the last week.

This years challenge was centered around Senior Citizens and problems they may have as they get older.  The competition has four parts- Core Values (teamwork), Research Project, Robot Design, and everyones favorite, the Robot Competition.  Neither team did well in the Robot competition- the 8th Grade team "The Old Farts" could have gotten a boatload of points if everything had gone perfectly, but they had some sensor and battery issues that kept them in about the middle of the pack.  The 7th grade team (S.L.O.- Senior Lego Organization) didn't have any working programs at game time, but over the course of the day managed to get a few working between rounds.

The Old Farts even managed to win one of the Core Values awards, and are going to the State Tournament in Twin Falls!  Hopefully the extra month will give them time to work out the bugs in their programs.

Some pics from the day.

Setting up in the pit.

Photobucket

Furiously writing and testing programs...

Photobucket
Photobucket

In the ring.

Photobucket
Photobucket
Photobucket
Photobucket

Final score, Old Farts:  135.

Photobucket

Final Score, Team SLO: 85.

Photobucket


Best run of the day:  325 points!!!

Photobucket


Old Farts receiving their award.

Photobucket 

Long day, glad its over and everyone had fun.

Wednesday, December 05, 2012

Cafe Racer

So... I really don't think this is all that great, but I have wanted to build a cafe racer since before cafe racers were cool.  I wanted a supermoto before anyone knew what they were.  I wanted to build a "replica" board track racer of a Flying Merkel, but every single time, someone beats me too it.  I just never have the time or money to do it before it gets cool.  That means that the next big thing will be home built frakenstien military bikes- and I'm already starting to see "zombie apocalypse" bikes, which means my next great idea will have been done before I get a chance to do it.

Anyways, I've been working on this for well over a year now.  This bike is POJ, if you read back aways I wrote several "chapters" about finding and fixing it up- it was my first ever bike.  I am slowly working on turning it into a Cafe, but without and permanent cutting / hacking so I could someday restore it back to original if I wanted.  Its getting closer, but I hit a snag trying to find a plug for the oil pump, so I thought what the heck, lets try making a tank.

Here's where I'm at.
Photobucket
Photobucket
Photobucket
Photobucket
Pretty ugly, but its a start.  The seat will get cut way down and the tank will be cut down an inch on the top and almost two off of the bottom, marked with the lines here:

Photobucket 

It's been a fun project, just a very slowwww one.  I plan on making the first tank out of plain old cold rolled sheet, but I'm going to try brazing- something I've never done but would like to at least be able to show my students.  If all goes well, I will make a second one out of aluminum sheet.  Never really worked with aluminum, so that could be interesting.  REALLY need to figure out what to do about the oil pump plug and finish up the kickstand and rearsets- they are close, just need a spring for the kickstand and a cross brace for the rearsets.  Yes, those are bmx bicycle pegs for foot pegs... 

Friday, November 30, 2012

33.3333333333%

First Trimester done.  Sure flew by...

Thought I would share this.  The woods teacher across the hall taught a Construction Trades class this last tri, and this is one of the projects they did.  It's a working wooden model of a backhoe, complete with water-powered hydraulic rams (syringes).


Photobucket 
Works great, too!  If he spent some time getting all of the air out of the system it would be a lot faster, but as it was he had come in on a non-student school day to finish it up.


On a completely unrelated note...  My 9 year old wanted to do some experimenting last night.

Photobucket 

He's fine, didn't even get zapped, but it sure scared the bejeebers out of him.  He says he won't ever do it again unless he has the proper safety equipment, tools, and Mom and Dad's permission...  Not quite the message we were trying to convey when we were talking to him about it, but I guess it will have to do? 

Monday, November 26, 2012

Air engines and Sketchup Animations

Been tinkering with this for the last couple of weeks.  A new trimester starts next Monday, and I get to teach a new class.  This is one of the projects I'm hoping will turn out well...  We'll see.  I found this cool air engine project on instructables.com  :

http://www.instructables.com/id/Air-Engine/


As you can see, it is VERY involved, and uses about 30 different machine tools that I don't have in my classroom...  So I set about to re-create it using nothing more than a drill press, a welder, and various hand tools.  Here's what I came up with.

The class this is for is an Engines & Metals class, so there has to be some welding...  Making the "crankcase".

Photobucket
Photobucket
Photobucket
Photobucket
Making the cylinder.

Photobucket
First attempt at a piston- using an allen bolt I had sanded down.  Didn't work- didnt have enough piston skirt and it would get kinked sideways and jam.

Photobucket
Photobucket
Beggining assembly- the piece of bicycle chain was used for the crankshaft.

Photobucket
Exploded view of parts.  Note the piston- I cheated a little and spun it down on my Smithy Lathe.  I think with the right size drill bit and metal rod, I can get it to work with some light sanding in the drill press.

Photobucket
Assembled!

Photobucket
Photobucket 
Some vid of it running!


And this was a breakthough for me- I finally figured out how to "animate" stuff in Sketchup.  I did this using the Proper Animation plugin.  Fairly simple, hoping I can get it to work a little smoother.  Still playing with it.


So there you go.  I have several changes in mind for the one my students will build, hopefully making it a little simpler to lay out and build without using any machine tools.  Watch for some samples in a few weeks!

Friday, November 16, 2012

Mikuni Mouse

Absolutely no plan in mind... Just start cutting. 

So I had an old carburetor I wanted to cut up to make a cutaway.  I started cutting and realized I would have a fairly large chunk leftover.  I have no idea how my mind finally arrived at this particular destination, but as luck would have it a computer mouse and a Mikuni Carburetor were about to cross paths.

Had this mouse that worked, but had some loose buttons.

Photobucket

Had this carb I had cut up...

Photobucket

Cut the mouse up a little more.

Photobucket

Machine a bigger hole in the carb.

Photobucket

after GOBS of mucking around- the final set of parts.

Photobucket


Assembled and working!

Photobucket

Photobucket


Photobucket