Kinda hit me over spring break that the end of another year is darn near upon me. Two more months and schools done- the crazy summer "break" begins. First week will be spent helping chase 70 some odd 8th graders all over California... The next week will be spent babysitting a nephew, then two weeks of "vacation", and maybe a week or two of trying to get some projects knocked out in there somewhere, and then a week or two of getting ready to go back to school.
Ug.
Can we cancel summer this year?! Just kidding!!!
Been thinking a fair bit on changes that are happening or might happen... Will be interesting to see the education scene next year. Common core is here (at least, until the next lawmaker sees fit to adopt another new program) so there will be all kinds of changes with that. Funding, of course, is anyones guess. Will the state decide like so many others that problem solving and higher thinking (read: hands-on problem solving / the classes I teach) are worthless and decide that money is better spent somewhere else?
This is one of my constant fears. I think I do a pretty good job already of involving aspects of all other subjects in my classes. Having no real set standards or other teachers to align instruction to, I'm pretty free to pick and choose what I want to teach my students. My tech classes are centered around the design process and problem solving. I involve a fair bit of writing, research, math, and science with the engineering and technology end of things. Definitely heavy on the hands-on part. I'm looking forward to adapting Common Core to my classes, if I can make it through the pages and pages of red tape. My other classes are more focused on trying to develop some actual hand skills, but we still use a fair bit of math, reading, and writing.
After 3 1/2 years of teaching, I finally feel like I'm finding my groove. I know what I want to do and have been making steady progress towards those ends- a "new" computer lab in my shop, the 3D printer, updating engines, tools, technology, etc. The more I feel like I understand the teaching game, the more I feel like I have hoops to jump through that while not necissarily bad, they are detracting from the time I could be spending preparing myself, my lessons, or my students to be more successful.
My question is where do I (we?) go from here? I know my classes make a difference to my students. I took classes very similar 20 years ago- and they made a difference to me. Unfortunately, the classes I took are no longer offered at the school I went to. The shop is as I understand it pretty much gone. What happens when all we have left is a classroom, with 35 kids sitting there jacked in to their computer clicking through a presentation? How does that teach them to generate ideas, work collectively, choose a possible answer, test it out, and evaluate and then present their solution?
Enough rambling. I have no idea where I'm going with this. I do feel that students need more oportunities to INVENT something. Not just follow a set of directions and assemble a gizmo- actually sit down and figure out what needs to be done, how they plan on doing it, and then attempt it. I say attempt on purpose- failure can be a good thing. In the words of Samuel Beckett:
"Ever tried. Ever failed. No matter. Try again. Fail again. Fail better."
Learn from our mistakes by MAKING them in the first place. Gotta start somewhere. What are you going to have YOUR students invent this week? Just be sure that you, as the teacher, are there to help pick them up from their "failure", turn it into a learning experience, and point them in the right direction. Kinda hard for a computer presentation to do that with a student, eh?

Motorcycles, metal working, sheet metal, welding, TIG, MIG, education, cafe racers, old trucks, mendelmax 2.0 3D printer, vintage, technology and design, custom hand made Hot Wheels, old John Deere, stationary, hit and miss engines. A little bit of everything in the garage.
Sunday, March 31, 2013
Saturday, March 30, 2013
Gettin my redneck on.
Figure 8 racing! Missed the first couple of heats but the ones we made it to were pretty darn good.
4 cylinder class last chance heat getting ready to go.

If you look real close, you can see a Fierro there in the front.


From the last race of the day for the grand prize- 9 4 bangers in a row... Some with some obvious issues, or maybe the smoke screen was intentional? Quick multi shot sequence from the line to the first corner. Keep your eye on the 'wagon.


As you can tell, it helps if you have an all wheel drive Subaru wagon... He made it all the way around teh first corner without any problems. Several of the others didn't... As you can tell by the backwards car there. The 'Suby did great right up until the last lap- broke a tie rod and lost his steering.
'Nuther set- Things that go *boom*.


Tires, apparently, optional.

Pretty good races. No rolled cars but lots of bumpin and exploding radiators and tires. Lotsa fun, even with the glares from the neighbors every time we got with 3 feet of their muddy truck. FYI- I'm pretty sure the car seat bouncing around in the bed was harder on your paint job than anyone resting their hand on the bedrail...
Anyone wanna donate a car? I'd love to do this someday!
4 cylinder class last chance heat getting ready to go.
If you look real close, you can see a Fierro there in the front.
From the last race of the day for the grand prize- 9 4 bangers in a row... Some with some obvious issues, or maybe the smoke screen was intentional? Quick multi shot sequence from the line to the first corner. Keep your eye on the 'wagon.
As you can tell, it helps if you have an all wheel drive Subaru wagon...
He made it all the way around teh first corner without any problems. Several of the others didn't... As you can tell by the backwards car there. The 'Suby did great right up until the last lap- broke a tie rod and lost his steering. 'Nuther set- Things that go *boom*.
Tires, apparently, optional.
Pretty good races. No rolled cars but lots of bumpin and exploding radiators and tires. Lotsa fun, even with the glares from the neighbors every time we got with 3 feet of their muddy truck. FYI- I'm pretty sure the car seat bouncing around in the bed was harder on your paint job than anyone resting their hand on the bedrail...
Anyone wanna donate a car? I'd love to do this someday!
Friday, March 29, 2013
From Zero to PRINTS!
So I have been working on making a "Quick Start" guide for a week or two now to hopefully make it easier for those who have never had the opportunity to mess with one to get started. This is by no means a finished product, nor would I consider it comprehensive and all inclusive, but I think this is a pretty good outline of what it takes to go from zero knowledge to 3D prints.
This is only a backbone for now. A lot of these sections have already been covered in many of my posts / blogs, so I will format and add all of those pieces of information in to this outline and we'll see how it turns out.
3D Printing Quick Start Guide
Printer Kit and Parts Selection
1. What are you going to use your printer for?
2. How much do you have to spend?
3. Where do you start?
Assembling the Kit
1. Frame
2. X-axis
3. Y-axis
4. Z-axis
5. Bits and Pieces
Installing the Electronics
1. Stepper motors
2. Power Supply
3. Control Board
4. Wire routing
5. Bits and Pieces
a. Power switch
b. USB cable
Installing Software and setting up printer
1. Drivers
2. Firmware
3. Software
4. Connecting the printer
5. Setting stepper driver voltage
6. Manually controlling the printer
G-codes
1. G92
2. G01
3. G90
4. Etc…
File Preperation
1. Export file from your CAD software as an .stl.
2. Open file in Netfabb and repair.
3. Open repaired file in Slic3r and create gcode.
4. Open in Printer Controller Software and PRINT!
Running a Print
1. Plug printer in to computer and power.
2. Open Printer Controller Software and click “Connect”.
3. Prep the print bed.
4. Preheat the Extruder and Bed
5. Load your file.
6. Set the home position.
7. Click PRINT and watch the show!
8. Clear the print bed.
9. Run the next part!
Troubleshooting
1. Missed steps
2. Printer freezing
3. Poor print quality
4. Etc….
Tuesday, March 26, 2013
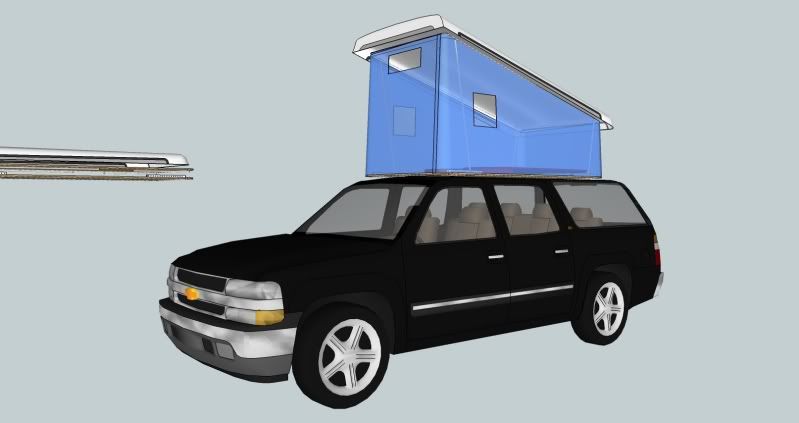
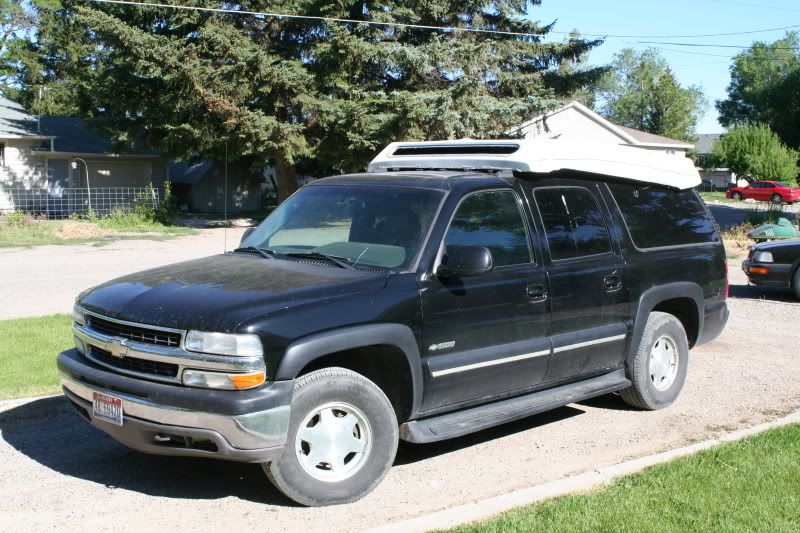
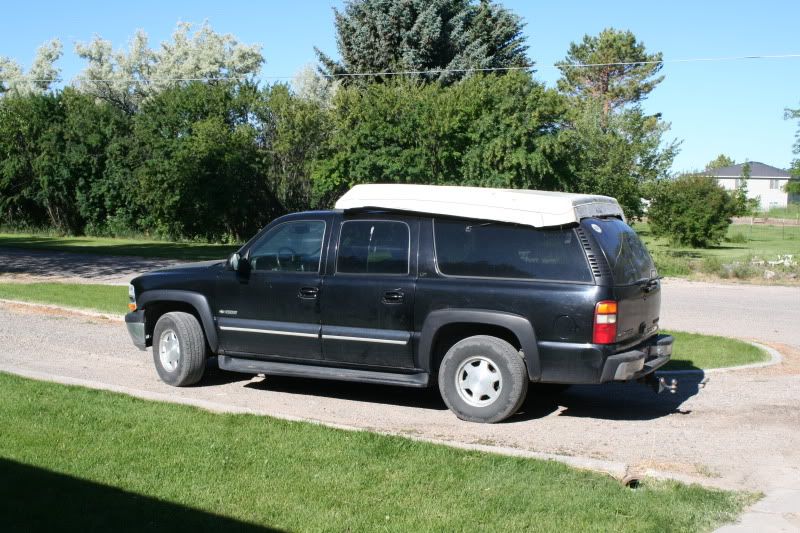
Pop Top Suburban.
I thought I had posted this already, but apparently not. Most of these pics / info is over a year old, and can also be seen here: http://www.advrider.com/forums/showthread.php?t=801632
Now that its spring break, I'm hoping to get this thing built. For now, here's the old info for y'all to catch up on.
This idea has been kicking around in the back of my head for a couple of years now. I want a "Poptop" that I can mount to the roof rack of my Suburban. I had a few basic design requirements-
1. Has to be TALL. At least 6 feet on one end. I'll still have to slouch majorly, but I can handle 6 feet.
2. Room for two people.
3. Simple construction, easy to build, no large time commitment.
4. CHEAP.
5. Was hoping that one person would be able to mount / dismount from the roof, but I don't think thats going to be possible unless I have a "hoist" of some sort in my garage... Also a possiblity.
After monkeyin around with this idea forever, Here's what I came up with. Got LOTS of other drawings with a ton more ideas, but here are a few basics to show you the idea.
Havent decided WHERE on the roof its going, but I am planning on putting it as far towards the front for two reasons- I can have a "door" in the floor where the sunroof is, allowing me to get in and out through the sunroof, and it will also leave the back end of the roof rack free for tying other stuff on.
Here you can see a little on how I plan to hold the lid UP. 4 pieces of conduit near the corners- once side much longer than the other. Not 100% on how I'm going to attach them to the lid, but current thinking is I will flatten the upper end of the conduit enough to put the skinny end of a T hinge in it, then weld the two together and bolt the whole thing to the roof.
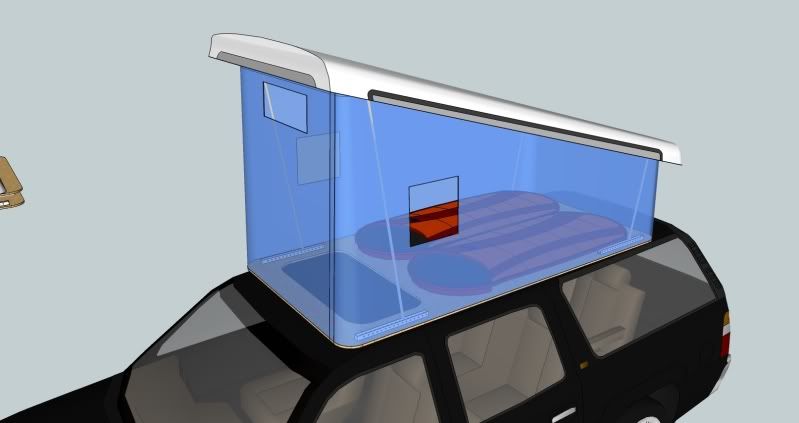
Sides of the camper will be coming from a ginormous canvas cabin tent I picked up at a yard sale a few years ago. The floor is likely going to be 3/4 CDX, but open to suggestions? Canvas will be stapled to the underside of the floor on the bottom, then a pocket will be sewn all the way around the top of the canvas. Inside of that pocket will be conduit to keep the shape, which will be bolted to the roof.
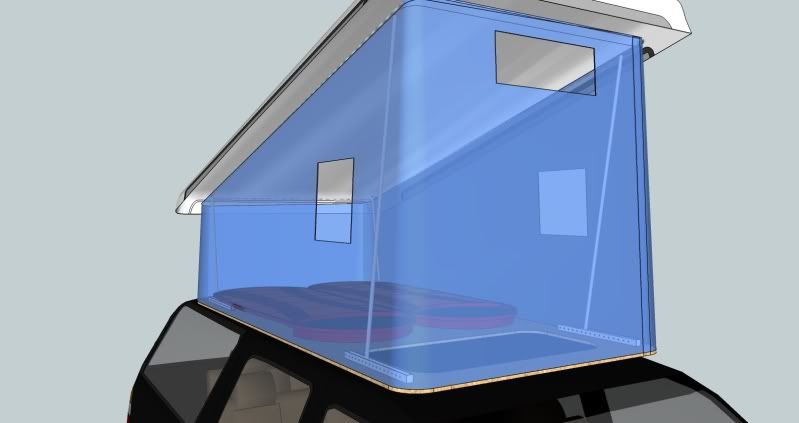
Lower end of the conduit will have something like pictured, but just a piece of angle iron or aluminum with slots cut in it for the conduit support pole to rest in- several of them to allow for adjusting tension.
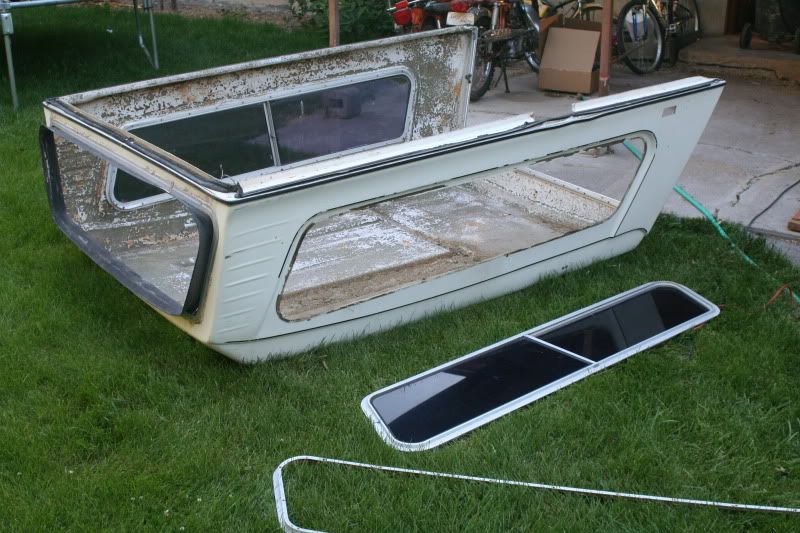
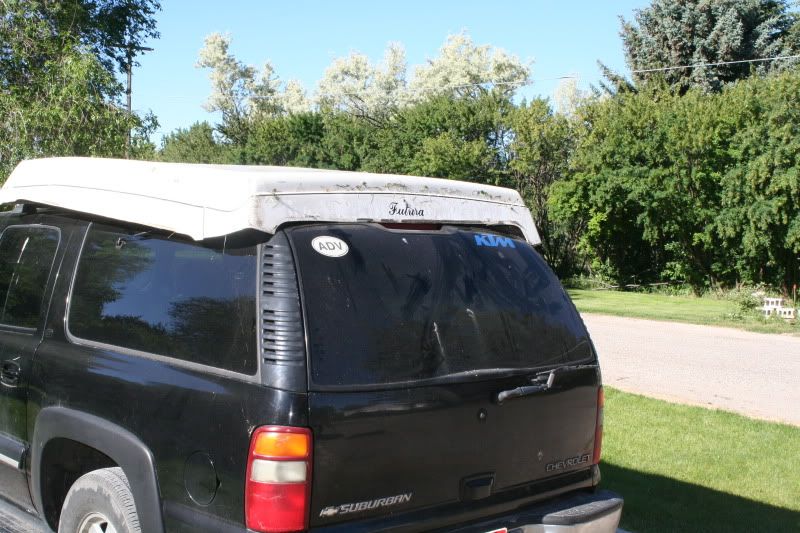
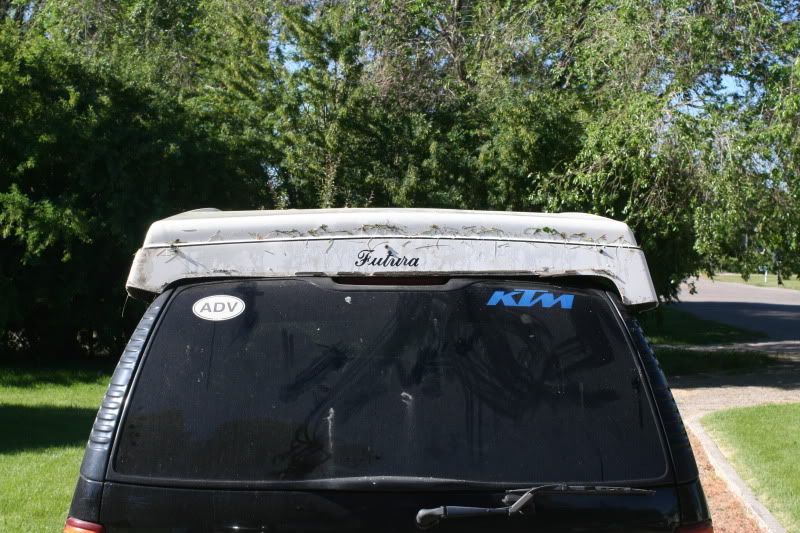
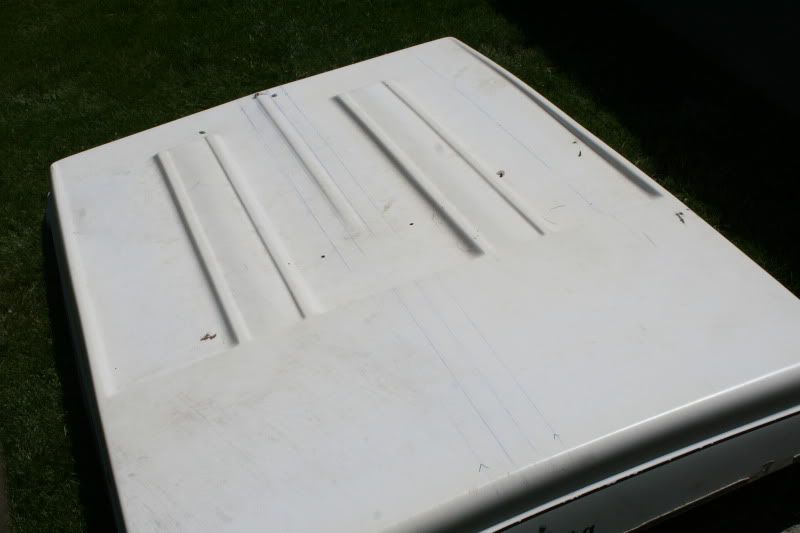
Course, all them's ideas are about 2 years old. I've been doing a lot of doodling and have come up with a lot of other ideas. Last summer, I scored this.
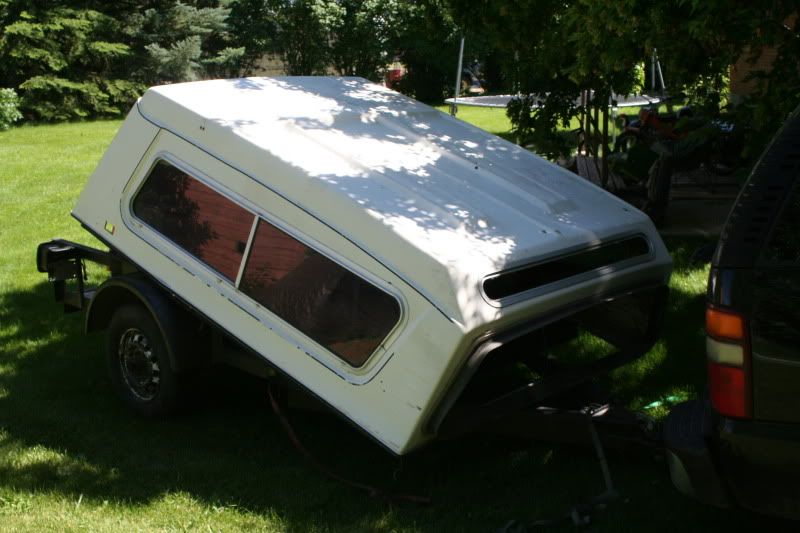
It was free. Came off of a '70's Ford long box, ironically.. Measurements are a little off for what I want but we'll get there in a bit.
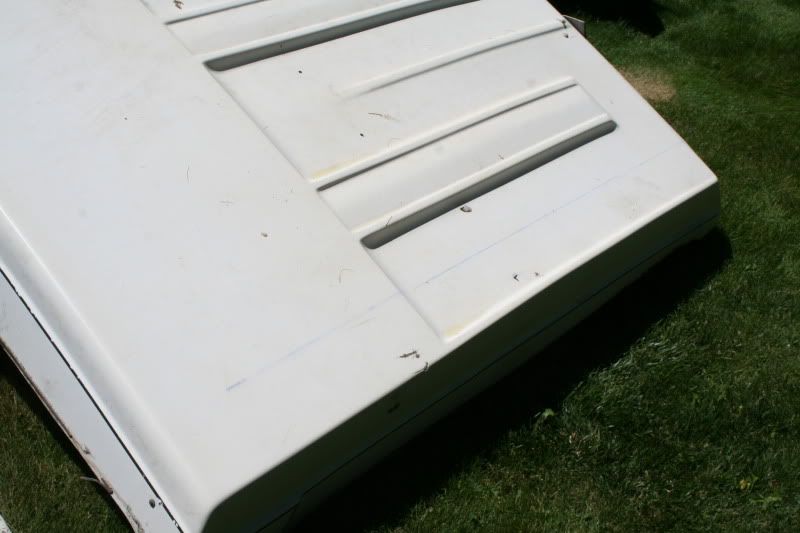
I got the saw out and started hacking. Jig saw- Not so much.
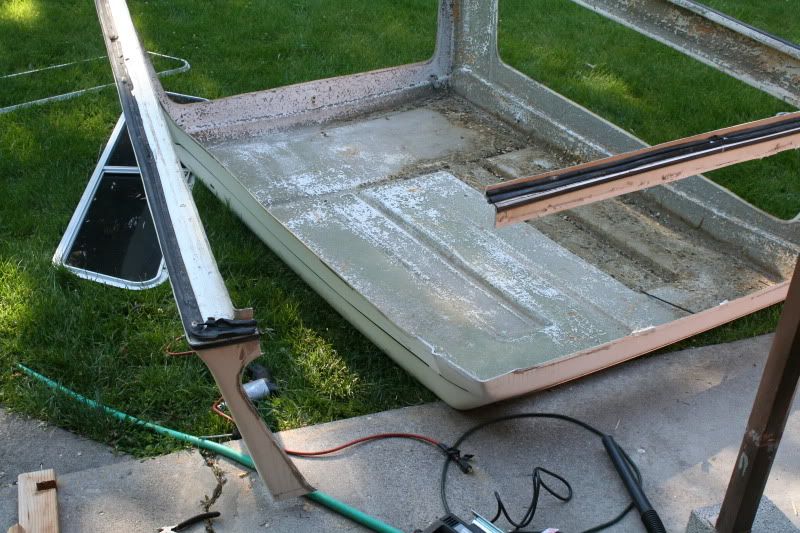
Skill saw with the blade on backwards- much better!
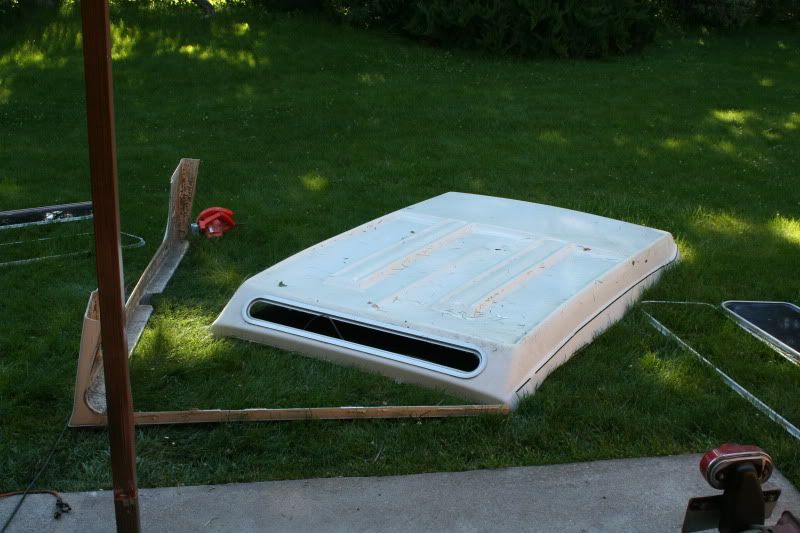
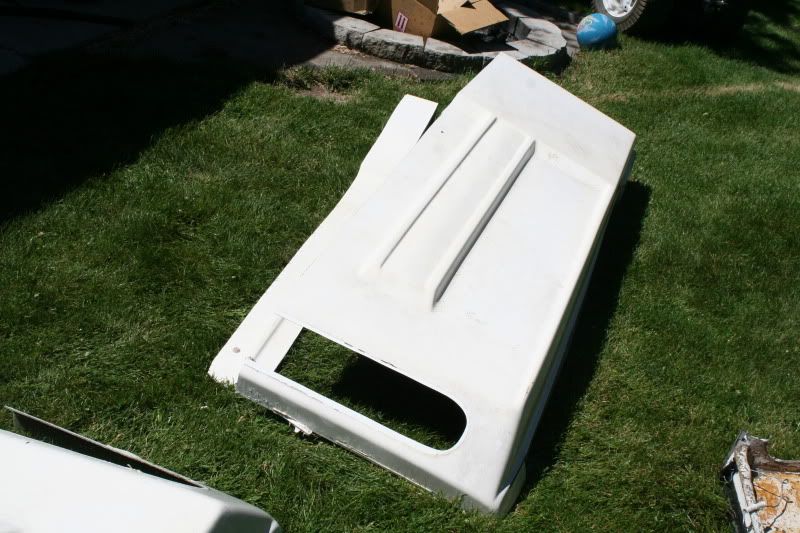
Here's where it'll be mounted.
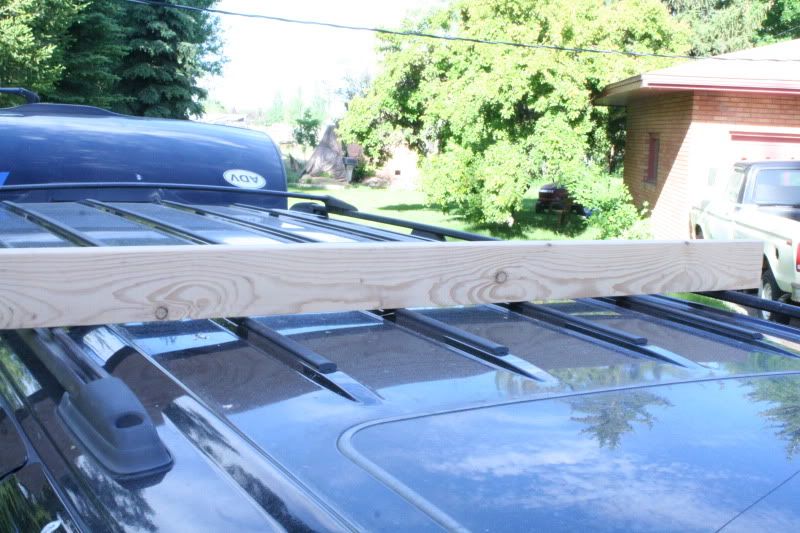
A sheet of plywood would sit on both outer racks and have the support of the middle rib all the way down. The roof is definitely strong enough to hold me standing on it with zero flex or dents in the roof, so I'm pretty sure a 3/4 chunk of plywood supported by the 2 roof rack bars and the center ribs will be plenty strong without any cross braces underneath, which will help keep the profile LOW.
Next issue- the roof curves down towards the front of the 'burb. This was going to be a problem because this is where I wanted to be able to stand- there wouldn't have been any support under this section of floor. Problem solved- I just wont stand. The sun roof entrance will be at the very far end of the floor meaning whoever's sleeping up there won't be able to do anything there anyways.
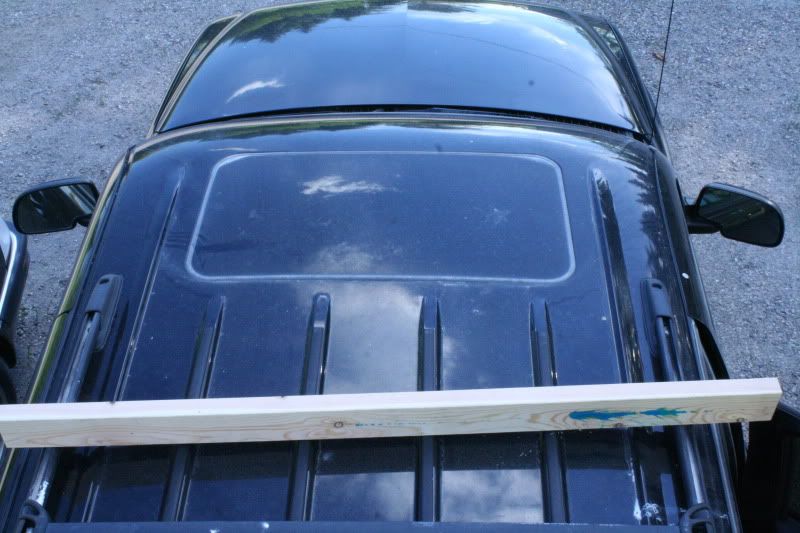
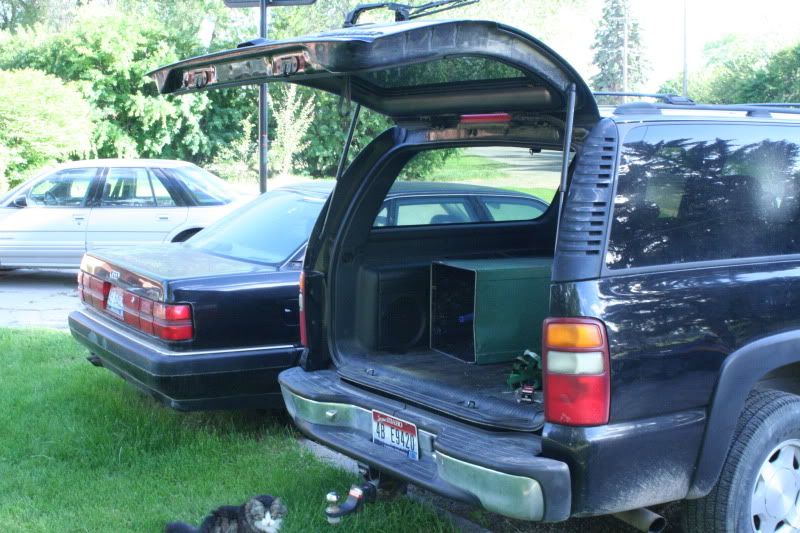
Another idea I've had kickin around for a while is to enclose this area- make some type of wall that hooks to the hatch when its open like this creating a "room" off the back of the 'burb. This is a long ways down the road but you never know. I can *just* stand under this without bonking my head.
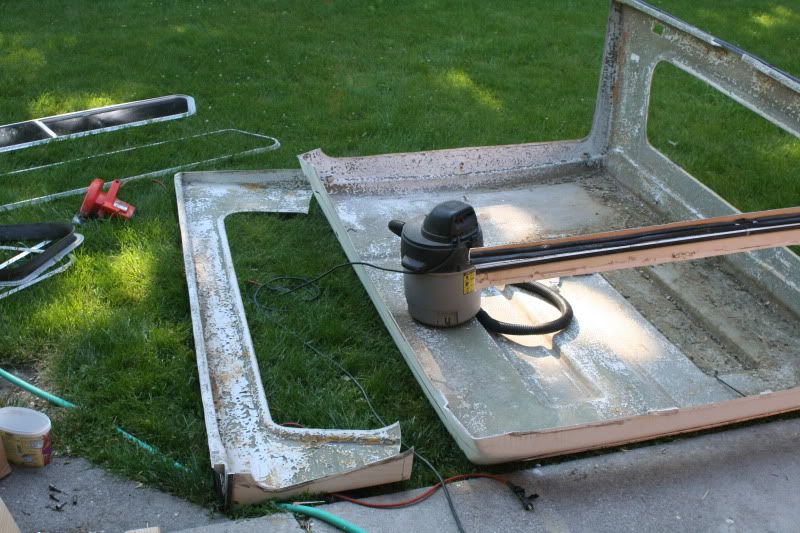
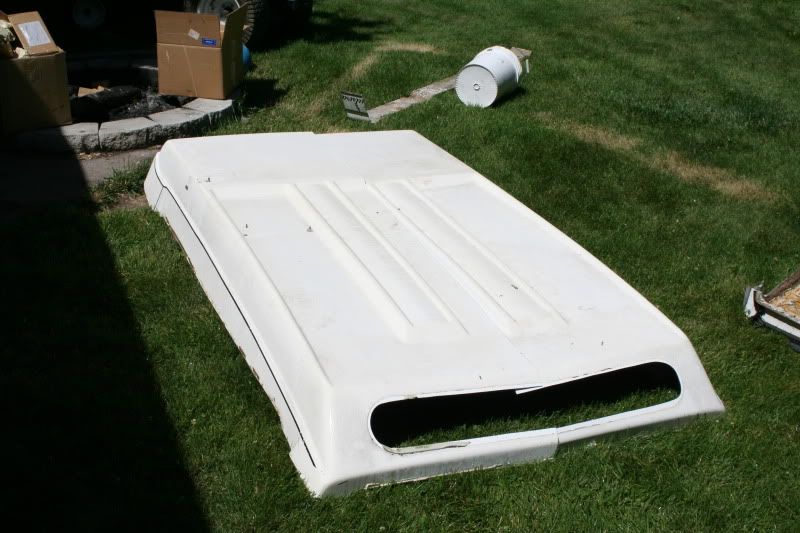
Test fitting.
Its way too wide. Going to chop it about 5 inches in from one side, overlap the two pieces, and bolt them back together with copious amounts of silicone in between. Think it'll work?
Hardest part is going to be trimming around the edges to match the contours of the suburban after I get it cut down to the right size...
Chopy chopy.
Here's what I was thinking at first- cut on blue line, overlap, bolt together.
Wasn't going to give me enough room, and I didnt want to chop BOTH side and bolt them together, so I decided to cut the middle. REALLY didnt want to do this cause it seems like a guaranteed leak point, but oh well. We'll see how it works. Markin and measurin.
Chop chop.
Overlaps about 3 inches. Will be bolted & glued together down the center, and will have more support from the conduit frame that holds up the tent wall.
So there you go. Should be all caught up. I do have the two halves bolted together, and have scrounged up some extra house wrap scraps to use for the tent walls. Changed the design for the struts quite a bit and am going out to Home Depot here in a bit to buy parts. *HOPEFULLY*, I will have more progress to report this week! Really hoping to be able to get out and use it on the Father-Son campout this year, which is usually in April.
Now that its spring break, I'm hoping to get this thing built. For now, here's the old info for y'all to catch up on.
This idea has been kicking around in the back of my head for a couple of years now. I want a "Poptop" that I can mount to the roof rack of my Suburban. I had a few basic design requirements-
1. Has to be TALL. At least 6 feet on one end. I'll still have to slouch majorly, but I can handle 6 feet.
2. Room for two people.
3. Simple construction, easy to build, no large time commitment.
4. CHEAP.
5. Was hoping that one person would be able to mount / dismount from the roof, but I don't think thats going to be possible unless I have a "hoist" of some sort in my garage... Also a possiblity.
After monkeyin around with this idea forever, Here's what I came up with. Got LOTS of other drawings with a ton more ideas, but here are a few basics to show you the idea.
Havent decided WHERE on the roof its going, but I am planning on putting it as far towards the front for two reasons- I can have a "door" in the floor where the sunroof is, allowing me to get in and out through the sunroof, and it will also leave the back end of the roof rack free for tying other stuff on.
Here you can see a little on how I plan to hold the lid UP. 4 pieces of conduit near the corners- once side much longer than the other. Not 100% on how I'm going to attach them to the lid, but current thinking is I will flatten the upper end of the conduit enough to put the skinny end of a T hinge in it, then weld the two together and bolt the whole thing to the roof.
Sides of the camper will be coming from a ginormous canvas cabin tent I picked up at a yard sale a few years ago. The floor is likely going to be 3/4 CDX, but open to suggestions? Canvas will be stapled to the underside of the floor on the bottom, then a pocket will be sewn all the way around the top of the canvas. Inside of that pocket will be conduit to keep the shape, which will be bolted to the roof.
Lower end of the conduit will have something like pictured, but just a piece of angle iron or aluminum with slots cut in it for the conduit support pole to rest in- several of them to allow for adjusting tension.
Course, all them's ideas are about 2 years old. I've been doing a lot of doodling and have come up with a lot of other ideas. Last summer, I scored this.
It was free.
Came off of a '70's Ford long box, ironically.. Measurements are a little off for what I want but we'll get there in a bit.I got the saw out and started hacking. Jig saw- Not so much.
Skill saw with the blade on backwards- much better!
Here's where it'll be mounted.
A sheet of plywood would sit on both outer racks and have the support of the middle rib all the way down. The roof is definitely strong enough to hold me standing on it with zero flex or dents in the roof, so I'm pretty sure a 3/4 chunk of plywood supported by the 2 roof rack bars and the center ribs will be plenty strong without any cross braces underneath, which will help keep the profile LOW.
Next issue- the roof curves down towards the front of the 'burb. This was going to be a problem because this is where I wanted to be able to stand- there wouldn't have been any support under this section of floor. Problem solved- I just wont stand. The sun roof entrance will be at the very far end of the floor meaning whoever's sleeping up there won't be able to do anything there anyways.
Another idea I've had kickin around for a while is to enclose this area- make some type of wall that hooks to the hatch when its open like this creating a "room" off the back of the 'burb. This is a long ways down the road but you never know. I can *just* stand under this without bonking my head.
Test fitting.
Its way too wide. Going to chop it about 5 inches in from one side, overlap the two pieces, and bolt them back together with copious amounts of silicone in between. Think it'll work?
Hardest part is going to be trimming around the edges to match the contours of the suburban after I get it cut down to the right size...
Chopy chopy.
Here's what I was thinking at first- cut on blue line, overlap, bolt together.
Wasn't going to give me enough room, and I didnt want to chop BOTH side and bolt them together, so I decided to cut the middle. REALLY didnt want to do this cause it seems like a guaranteed leak point, but oh well. We'll see how it works. Markin and measurin.
Chop chop.
Overlaps about 3 inches. Will be bolted & glued together down the center, and will have more support from the conduit frame that holds up the tent wall.
So there you go. Should be all caught up. I do have the two halves bolted together, and have scrounged up some extra house wrap scraps to use for the tent walls. Changed the design for the struts quite a bit and am going out to Home Depot here in a bit to buy parts. *HOPEFULLY*, I will have more progress to report this week! Really hoping to be able to get out and use it on the Father-Son campout this year, which is usually in April.
Thursday, March 21, 2013
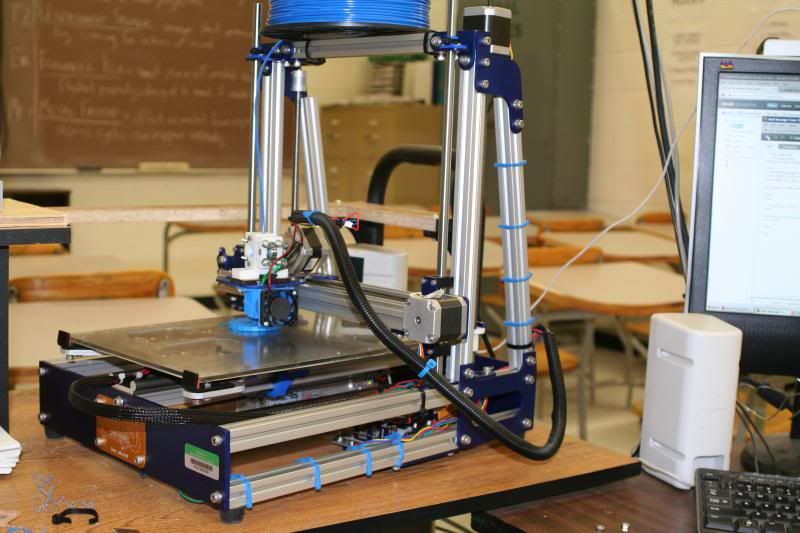
3D printed parts- Functional? YES!
Been working on fine tuning the Mendelmax 2.0. Have figured several things out, and am working on a few "Quickstart" guides. In the meantime, here's a few of my test pieces.
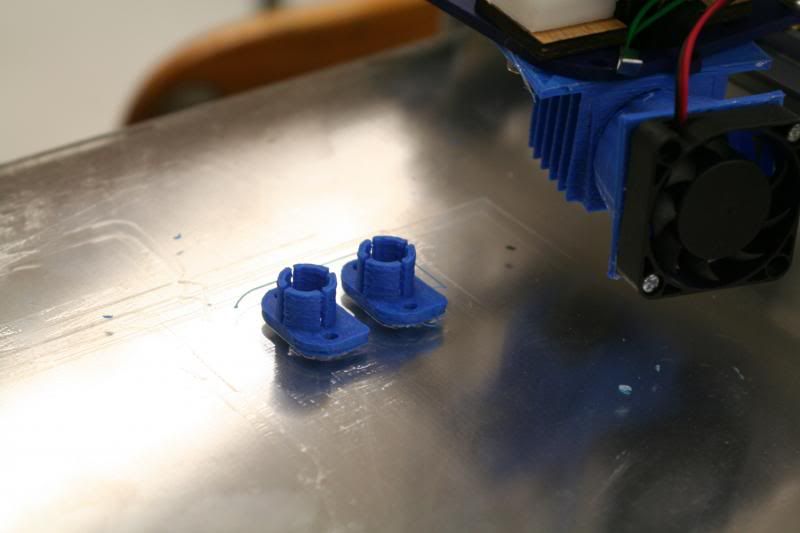
One of my students asked me if I could make some parts for his dads motorcycle helmet that he apparently was unable to find anywhere. There were to pieces, mirror images, and only one was broken. He brought both parts in, I measured them up and drew it up in Sketchup. The black are the old, you can see the one on the left is missing a piece. Blue are the new parts, and they are pretty darn close!
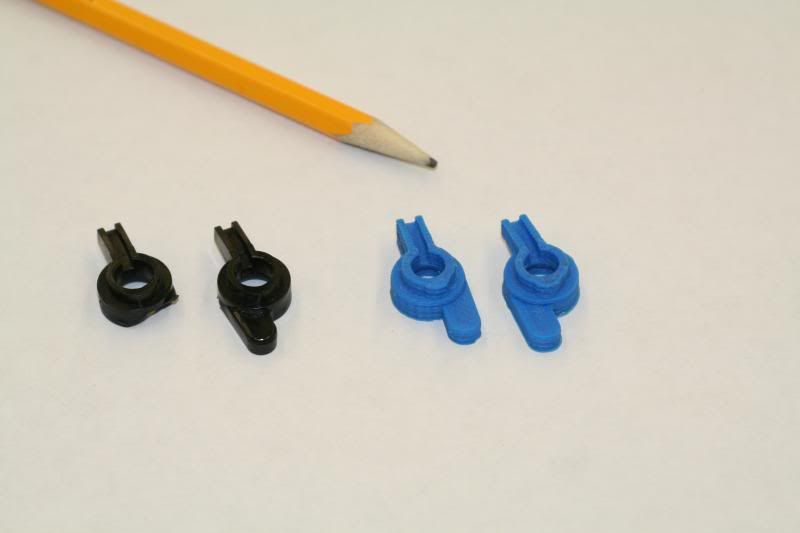
I had to go back after they printed and cut a little piece out, but it took all of 5 seconds on each part.

Had the speeds turned down quite a bit and the quality looks excellent. Took about 13 minutes to finish both of them. He told me today the parts fit perfectly and the helmet works like new!
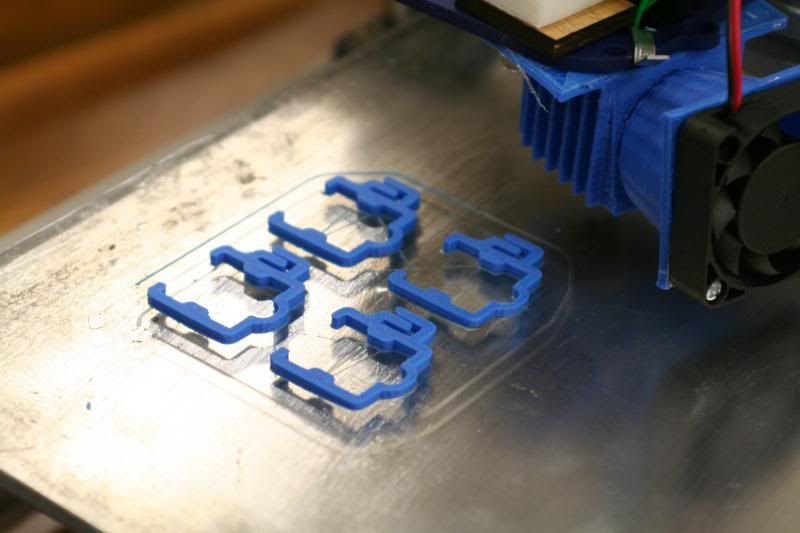
'Nuther project for the woods teacher. He wanted some rollers to fit on a pipe rail thingy he's building. Much bigger print, took about 43 minutes for each half at high speed.
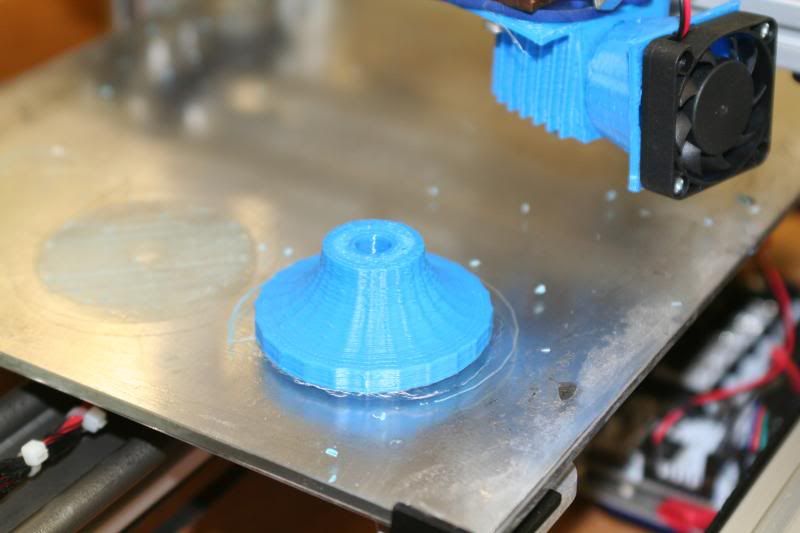
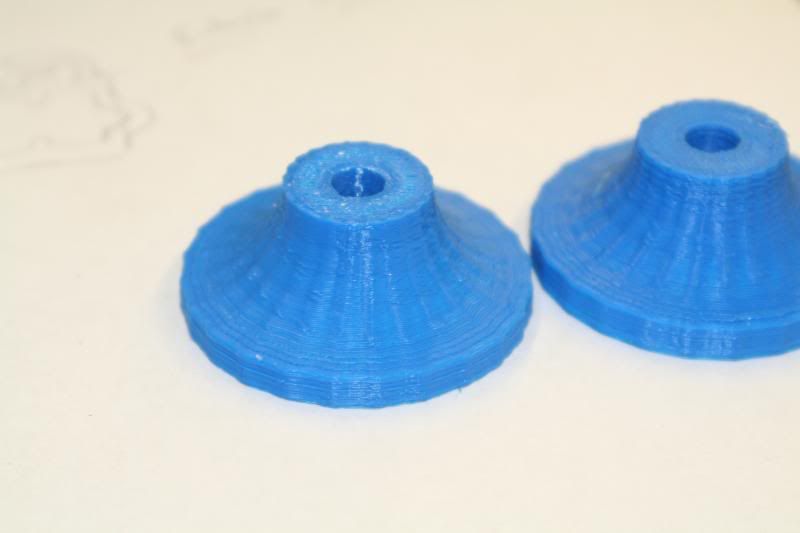
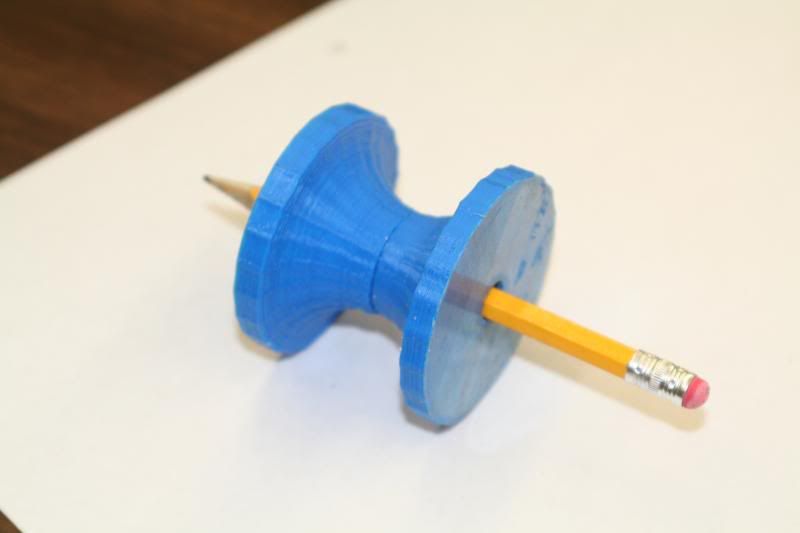
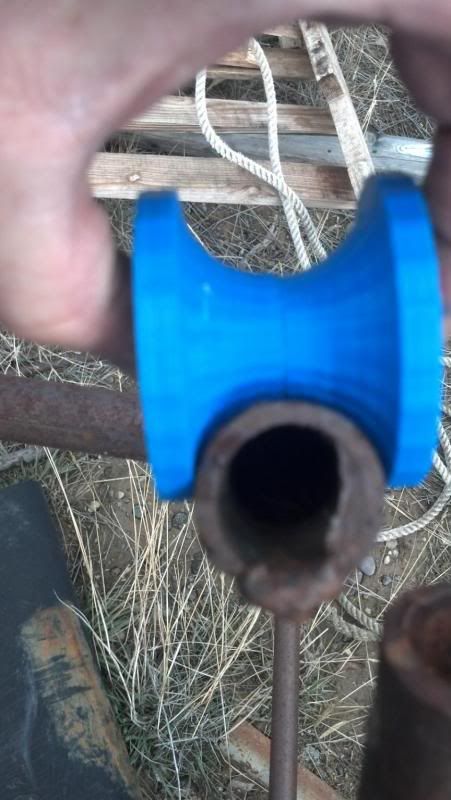
As you can see, they are a little rough. There is a setting to crank up the number of "edges" in a circle in Sketchup, but I forgot to change that and had it printing already. He took it home and tried it on the pipe, said he thinks it will work perfectly the way it is. He needs three more, then he's going to build a rail out of the pipe and a carriage with the wheels to go on the pipe to carry his cutting torch.
Pic he texted me:
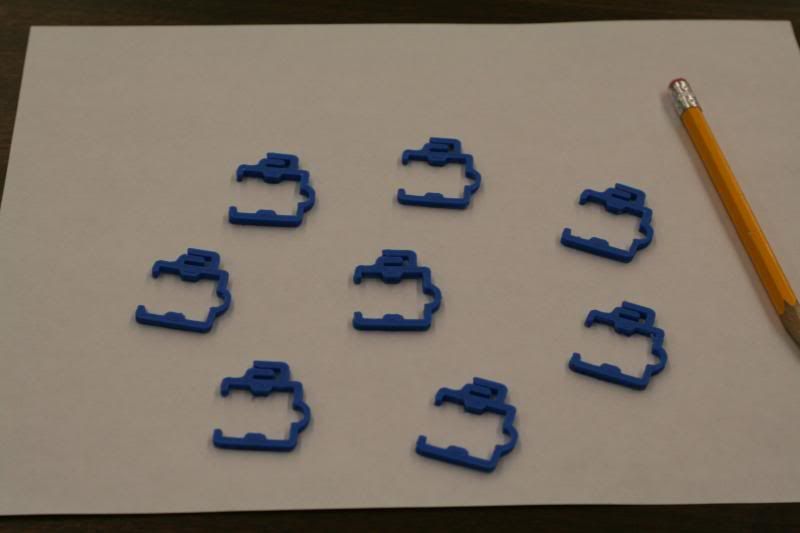
And some spare parts just in case. Speed was cranked up on these too, and they came out pretty nice. Maybe a 2 minute print time.
And lastly today's somewhat useless invention. Made these snaps to go on over the extrusions to hold wires down.
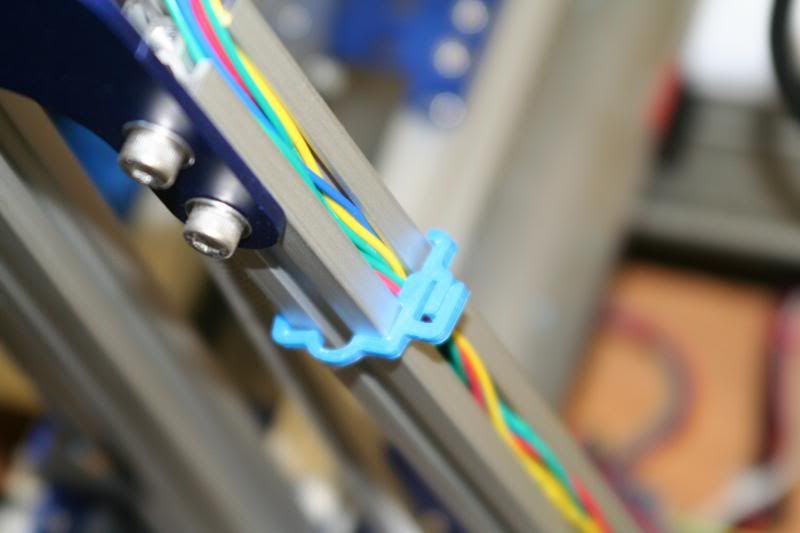
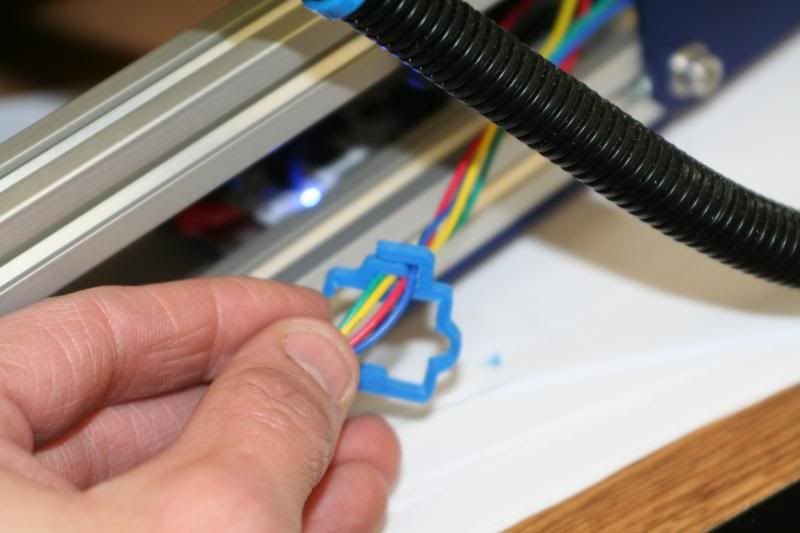
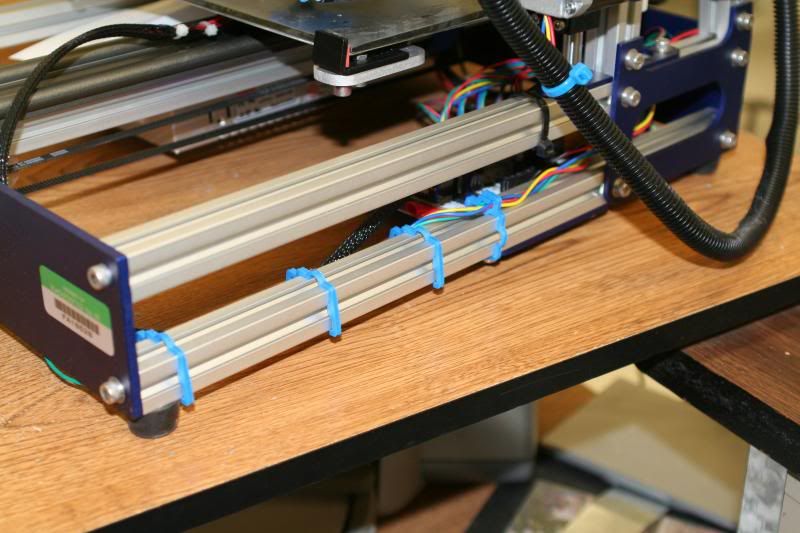
I was sure someone had to already have thought of this, turns out I was right...
http://www.thingiverse.com/thing:15812
I've been starting to make separate "profiles" in Slic3r- I have one for small parts with slower speeds and cooling fan, and one for larger parts with higher speeds. Finally starting to get the hang of this thing, LOTSA fun! The Mendelmax is more than capable- even more than I had hoped. Still need to get the updated z axis parts installed, maybe over spring break!
One of my students asked me if I could make some parts for his dads motorcycle helmet that he apparently was unable to find anywhere. There were to pieces, mirror images, and only one was broken. He brought both parts in, I measured them up and drew it up in Sketchup. The black are the old, you can see the one on the left is missing a piece. Blue are the new parts, and they are pretty darn close!
I had to go back after they printed and cut a little piece out, but it took all of 5 seconds on each part.
Had the speeds turned down quite a bit and the quality looks excellent. Took about 13 minutes to finish both of them. He told me today the parts fit perfectly and the helmet works like new!
'Nuther project for the woods teacher. He wanted some rollers to fit on a pipe rail thingy he's building. Much bigger print, took about 43 minutes for each half at high speed.
As you can see, they are a little rough. There is a setting to crank up the number of "edges" in a circle in Sketchup, but I forgot to change that and had it printing already. He took it home and tried it on the pipe, said he thinks it will work perfectly the way it is. He needs three more, then he's going to build a rail out of the pipe and a carriage with the wheels to go on the pipe to carry his cutting torch.
Pic he texted me:
And some spare parts just in case. Speed was cranked up on these too, and they came out pretty nice. Maybe a 2 minute print time.
And lastly today's somewhat useless invention. Made these snaps to go on over the extrusions to hold wires down.
I was sure someone had to already have thought of this, turns out I was right...
http://www.thingiverse.com/thing:15812
I've been starting to make separate "profiles" in Slic3r- I have one for small parts with slower speeds and cooling fan, and one for larger parts with higher speeds. Finally starting to get the hang of this thing, LOTSA fun! The Mendelmax is more than capable- even more than I had hoped. Still need to get the updated z axis parts installed, maybe over spring break!
Tuesday, March 19, 2013
Future Project, help wanted!
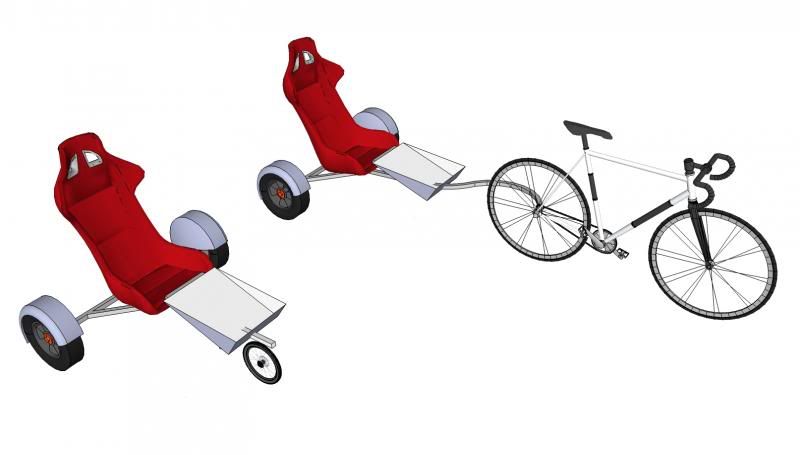
Alright, so some friends of mine approached me and asked me to build the a bicycle trailer that they can carry their son, Dan in. Dan is about 35 years old and mentally handicapped. The trailer is going to have to be strong enough to carry him, light enough to be towed, and safe.
I've been kicking several ideas around for the last week and playing around on Sketchup. Here's what I've come up with. Remember, these are JUST ideas at this point, I really don't know much about bicycle trailers but I'm learning a lot along the way, and would love to hear it if anyone has any suggestions.
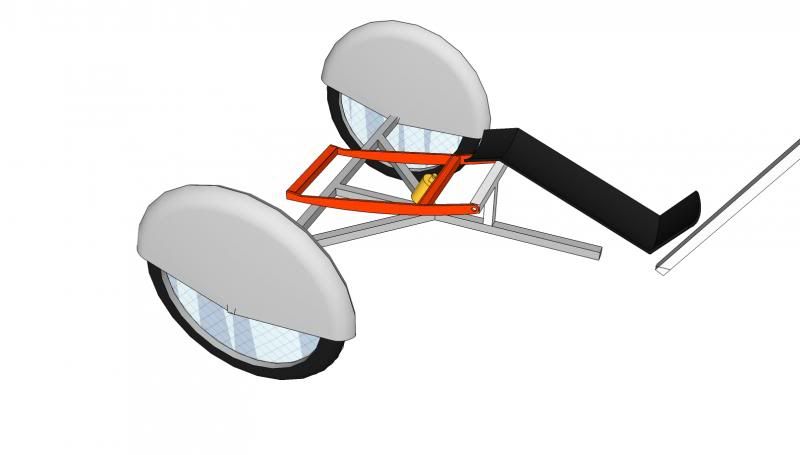
First sketches:

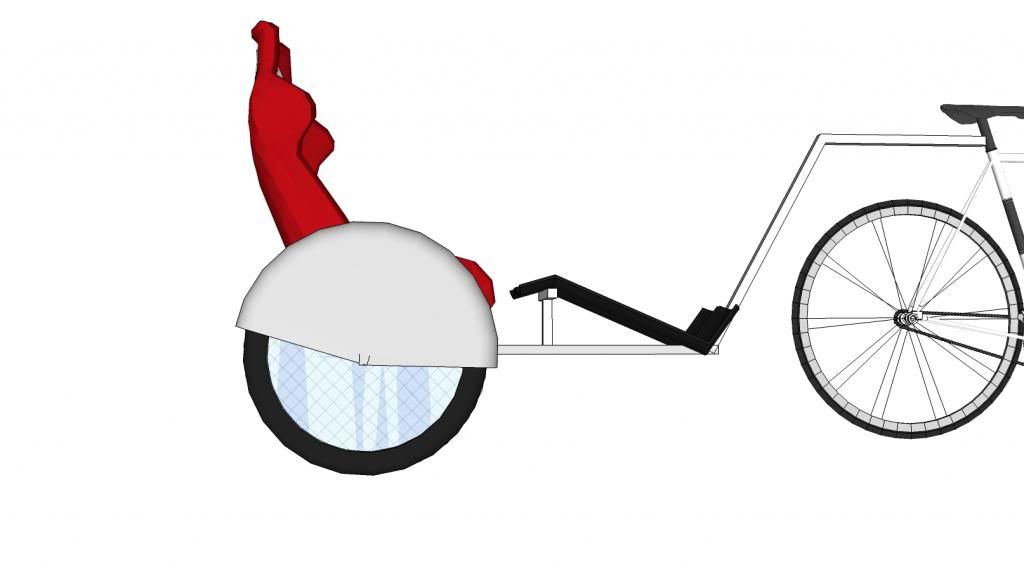
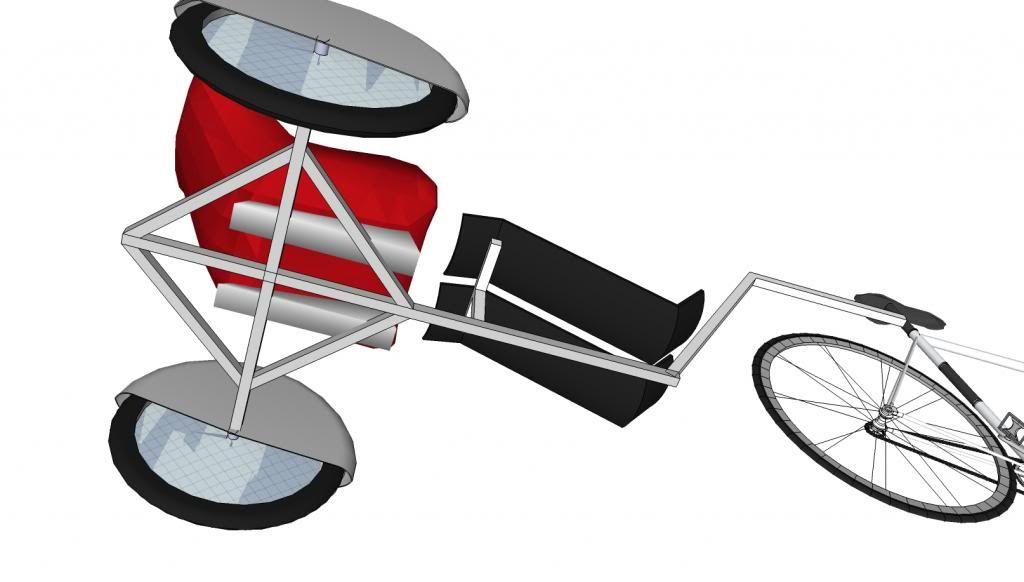
Real rough. As you can see from the next few sketches, a lot has changed. Kicked around a few more ideas, and discarded a few others.
Small tires, with a stroller version. Will be using bike tires, so this is moot.
Seat suspension. Probably won't be doing this.
Extended frame for adding a basket or carrying stuff.
Rollbar / pushbar for stroller.
Stroller, with detachable tongue / attachable caster wheel. Tongue stows under trailer.
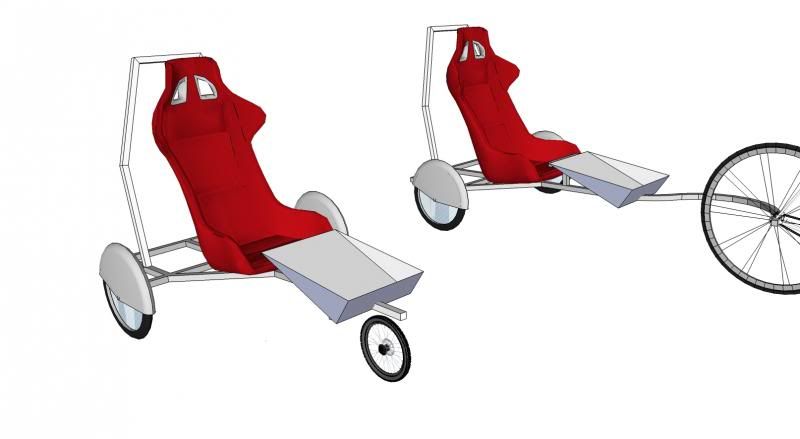
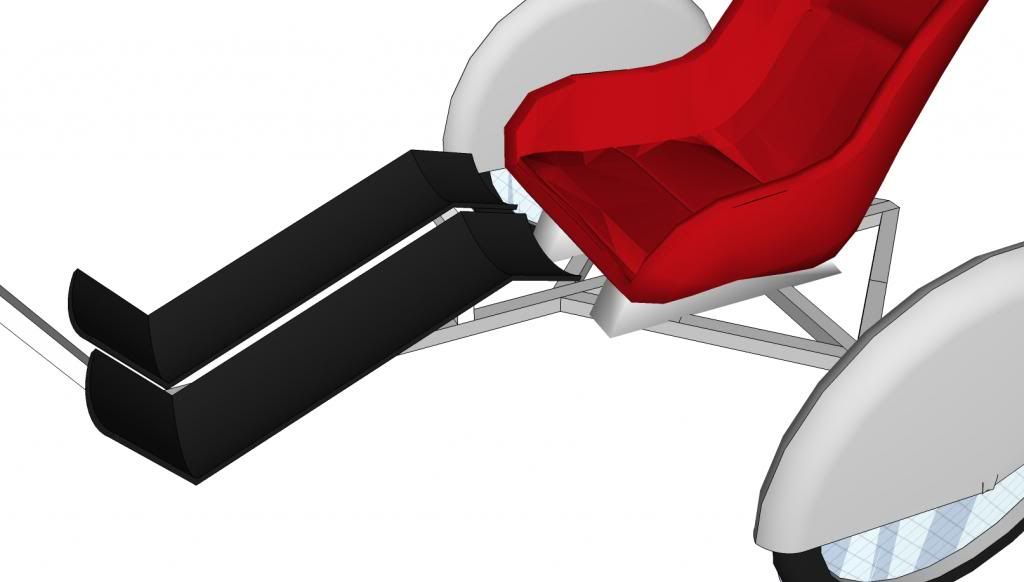
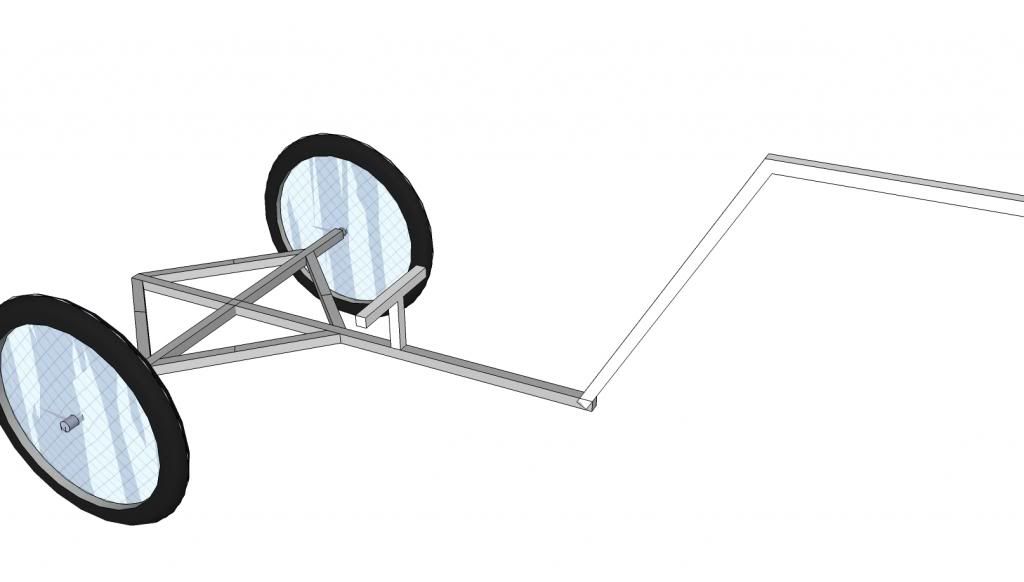
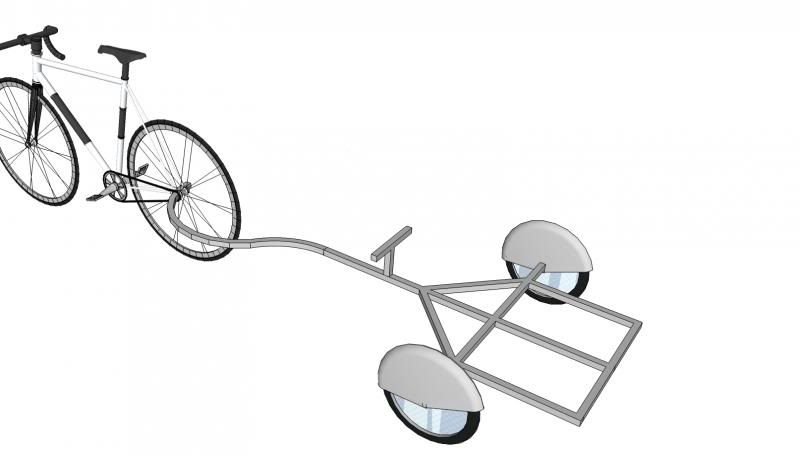
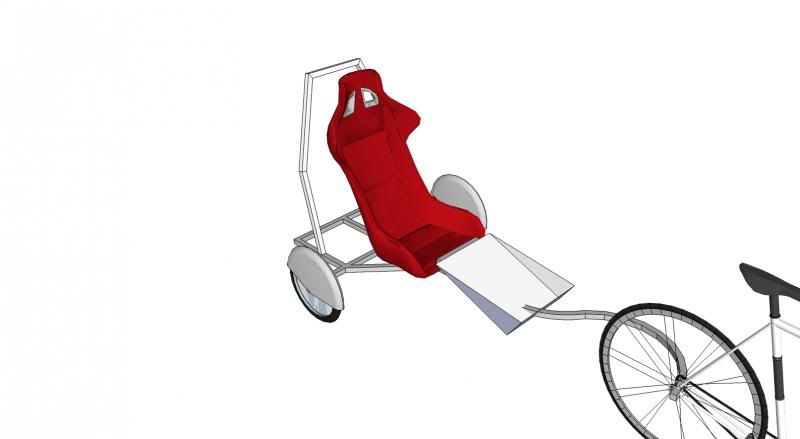
Other pics.
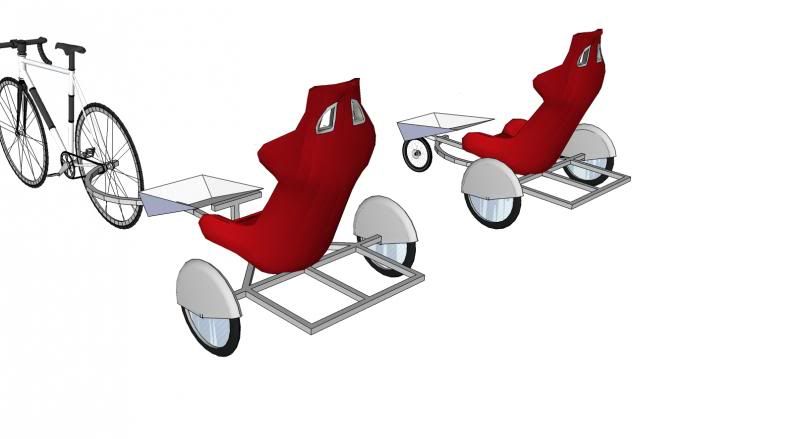
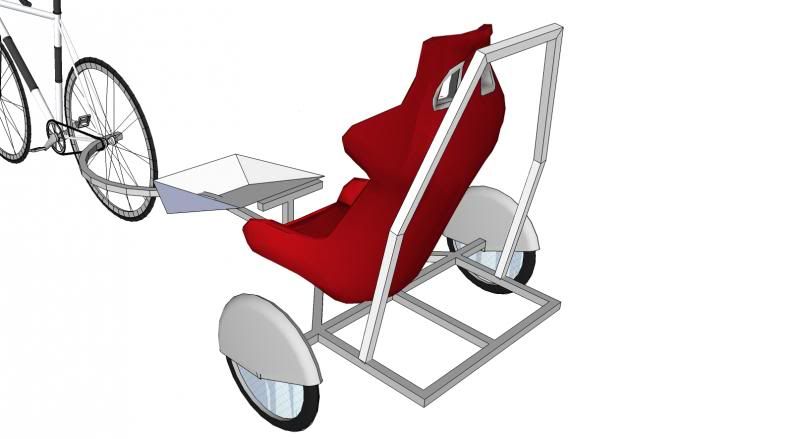
Keep in mind these are just design ideas... The trailer will likely be skinnier (this model has a 3' wide frame, will probably cut that down to 2') and change a bunch while building. Sounds like they really want me to build it, so I will, but there are a few other projects on the table and a few other things to iron out here first. May start on it over spring break, we'll just have to wait and see.
Current things we have decided on:
Bicycle wheels for sure. Probably 16", as I've read the smaller tires handle cornering forces better?
Low side mount tongue.
Some type of platform off the back to mount a basket or case of some sorts.
Fenders for the pull bicycles- Store bought.
Fenders for the trailer- going to try hand making them out of aluminum sheet, but no cover on the outside.
Rotomolded racing seat from JEGS, with a 5 pt harness.
Leg board most likely also hand made by me out of aluminum sheet.
Things they seem to maybe want:
Seat suspension
Stroller castor / removable tongue
Powedercoated frame.
There you have it. I want to try and keep very little weight on the tongue, so the seat position will likely move back. The axles will be 5/8" rod welded to the top of the frame crossbar to lower the center of gravity more. I will probably have to build some type of bracket behind the seat to mount the safety harness too as well.
Anything I'm missing? Or, I know I'm missing about thirteen hundred things, wanna enlighten me on a few?!
I've been kicking several ideas around for the last week and playing around on Sketchup. Here's what I've come up with. Remember, these are JUST ideas at this point, I really don't know much about bicycle trailers but I'm learning a lot along the way, and would love to hear it if anyone has any suggestions.
First sketches:
Real rough. As you can see from the next few sketches, a lot has changed. Kicked around a few more ideas, and discarded a few others.
Small tires, with a stroller version. Will be using bike tires, so this is moot.
Seat suspension. Probably won't be doing this.
Extended frame for adding a basket or carrying stuff.
Rollbar / pushbar for stroller.
Stroller, with detachable tongue / attachable caster wheel. Tongue stows under trailer.
Other pics.
Keep in mind these are just design ideas... The trailer will likely be skinnier (this model has a 3' wide frame, will probably cut that down to 2') and change a bunch while building. Sounds like they really want me to build it, so I will, but there are a few other projects on the table and a few other things to iron out here first. May start on it over spring break, we'll just have to wait and see.
Current things we have decided on:
Bicycle wheels for sure. Probably 16", as I've read the smaller tires handle cornering forces better?
Low side mount tongue.
Some type of platform off the back to mount a basket or case of some sorts.
Fenders for the pull bicycles- Store bought.
Fenders for the trailer- going to try hand making them out of aluminum sheet, but no cover on the outside.
Rotomolded racing seat from JEGS, with a 5 pt harness.
Leg board most likely also hand made by me out of aluminum sheet.
Things they seem to maybe want:
Seat suspension
Stroller castor / removable tongue
Powedercoated frame.
There you have it. I want to try and keep very little weight on the tongue, so the seat position will likely move back. The axles will be 5/8" rod welded to the top of the frame crossbar to lower the center of gravity more. I will probably have to build some type of bracket behind the seat to mount the safety harness too as well.
Anything I'm missing? Or, I know I'm missing about thirteen hundred things, wanna enlighten me on a few?!
Subscribe to:
Posts (Atom)