title

Motorcycles, tools, and garages! A little bit of everything mechanical and technical.

Showing posts with label Welding. Show all posts

Wednesday, February 11, 2015

Alphatig 200X Tig welder #1- a review.

Yeah, one of those "Cheap chinsy Chineese crap welders".


I've been sort of looking to upgrade my wicked old Century 5-star welder for about 2 years now. It's an decent welder- AC/DC, with a high frequency box, but its really a stick welder that I set up to do TIG. It simply will not work for what I want to do- weld thin aluminum sheet metal.

Finally had enough money that I've been seriously looking for a TIG welder for the last 2 months. I was hoping to buy used, get a decent older welder that met my needs- AC, foot pedal, and LOW amps. I have had ZERO luck finding one locally. I expanded my search to within a 4 hour drive and still couldn't find anything that fit my needs. Best I could do was a decent Lincoln squarewave 175, both out of my price range and too far away to be able to pic up.

Crusing ADVrider, I stumbled acrossed a post about the Alphatig. First thought- yup, junk. But dang, the price sure was good. Got to looking around and they have pretty darn good reviews.

Meh, I'll hold out for something good... and another couple of weeks pass by- while I'm still researching the Alphatig. Sounds impressive. Oh, the 2015 model fixed a few of the minor issues (not problems, but added more features) from the 2014? And its on SALE? Why not.

$790, ordered on amazon.com late Friday night and it was here Wednesday.

 
This worried me a little...


But everything looks okay.


Included junk.


From the upper right hand corner, going clockwise: regulator, foot pedal, plug adapter to go from 220 style to 110, ground clamp, pack of cups, collets, and torch parts, stinger for stick welding, TIG torch and cable, and the infamous "manual".

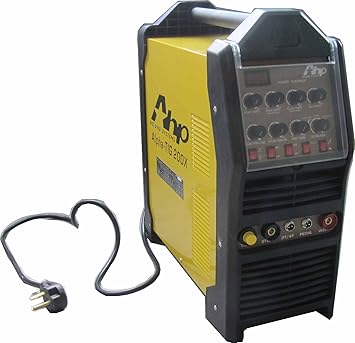
The welder itself- LOTS of buttons and knobs!


So far, quality looks pretty good. No loose anything like you would expect from something bought at Harbor Freight. I can tell I'm not going to like the goofy cover for the knobs- but it pops right off so it'll probably just store it somewhere and forget about it.

More to follow!

Saturday, January 24, 2015

Student Projects.

Lots going on in the dorkpunch garage lately, both mine at home and the school shop.  Students have been working on all kinds of things.  Been fighting the 3D printer lately but it seems (knock on wood) that I have it figured out.  Had some issues with a sticky z-axis and loosing steps in the y-axis.  The y-axis thing as been going on since nearly the time I built the printer- I had it narrowed it down to a bad control board but thought I would try a few more tests on the y-axis stepper driver.  Tried lowering the voltage- that seemed to work great for about 3 days.  Adjusted and tested it at several different voltages and it seems to be working very well at a slightly higher voltage than its supposed to be at.  Suppose that means it's going to melt here any day now...

Anyways, here's a couple of recent prints with several more to follow.  A headphone stand, and a piston / connecting rod.


Our school has been doing a "FLEX" program- kind of a recess on steroids where the kids that need help can go see their teachers or go do something fun if they are all caught up.  I've had several kids coming in to weld and do lots of other things like these custom Hot Wheels.


The silver one is just a paint and wheel swap- but it's a replica of one of the cars in a Fast and Furious movie.  The other one had the roof chopped off and a new paint job.  Didn't quite get the tape stuck down for the stripes, but not too bad!

Have another kid working on a new body for his R/C truck-


And then there's the welders...


They're getting better.  Have some really good welders- for sure all of them are WAY better than I was at that age. 

On another note, January is almost over.  Time to shave the beard and get ready to drag the bikes out- as long as we don't have the nasty fog / black ice covered roads we had today...

Tuesday, September 30, 2014

Dan's Chariot IN ACTION!!!

I finally have proof that the trailer I built works!  It's been used a bit and sounds like its working out well.


Dan, ready to go.


On the road.


They said they've put around 30 miles on it and love it. Glad its working out for them!


Some video of it in action:


Love watching him cruse. Hope they get a lot of use out of it!


Saturday, November 30, 2013

Dan's Chariot #11- 150 lbs of Beans, Sugar, Flower, and Powdered Milk.

Spent a little time today tying up a few final loose ends. Had an idea for the caster- put it on the tongue! The tongue can be flipped around, so when it was in "bike" mode, the caster would look something like this:


When it was in "stroller" mode, the tongue would be under the seat and the caster would be down.

Decided that would look too goofy so I just made up a new attachment.


Stroller mode.


I sat in it and wiggled all over trying to get it to tip over backwards- no dice. Suppose thats a good thing!

Made up a little bracket to help hold the basket straight. The basket has got to be the chinsiest thing I've ever seen.


Loaded it up and brought it back home for round 2 of testing. This time, I strapped 150 lbs of flour, beans, sugar, and powdered milk to it.


Back from another couple of miles.


I think it will work great for their intended use. It's a little more squirrel y when loaded if you are trying to do HARD stops or starts. I was worried about the tongue flexing too much or bending. It flexes, but I wasn't able to bend it with it loaded and being jerked around real hard so I figure it should be good. Still tracked great, only got up to about 30 mph a couple of times for several blocks.

Finally talked to the owners and we are going to powder coat it. Got to get a hold of the powder coaters around here and see what they are going to charge... Might end up spraying it if it's too expensive.

Getting close!

Tuesday, October 29, 2013

John Deere Green, with a chainlink twist.

Update on my John Deere 314 project.
My brother bought a 4 wheeler that came with a plow, so he lent me his blade. Got it all mounted up just fine.


Even tried it out!


There's a big low spot right there that always turns into a giant puddle. The tractor worked pretty good, still need to do some tuning on the carb it seems. After about 15 minutes of work though, I think I busted the bolt I installed in the drive line. Quit moving and had no hydraulics. Got to pull the pan up and check the bolt. In the meantime I picked up this,


So I can mount it at the same time I pull the pan back off to see what happened with the drive line.

AND! Finally went over to my brothers neighbor and settled on a price for some more attachements. I bought a tiller and a blower from him and he threw in a deck for free. The deck is REALLY rough though so I might not end up using it. Not sure what kind of shape the tiller and blower are in but for the price he asked I really don't care as long as they are complete. Looks like I should have everything I need except the belt director box that hangs under the front of the tractor when you want to use the deck.

A few days later :

Went to our local CAL ranch store. Getting real sick of their crappy hardware selection, and on top of that it hasn't been cleaned, sorted, or RESTOCKED in several months so all of the stuff you would normally need is out of stock. AND- No frickin pens to write down your parts. Almost tempted to go pay the higher prices at Fastenal. *sigh*

Anyways, here's what I finally came up with based on the limited selection they had. Just took an allen bolt and turned down the end, and reused the original set screw on the other side. Seems to be a lot more solid.


Got it installed and loctited, set the pan on with some new bolts, and installed the new seat. Again, CAL ranch didn't have the right stuff so I had to improvise a bit, but it is bolted down and not moving.

Now for the fun stuff. Couldn't bring myself to pay the price for a used steering wheel, and mainly didn't want to wait a week to get it so I sat down this afternoon with some scraps and this is what I came up with.

Wrap some old chain around a 5 gallon bucket and tack weld it.


Note- it WILL melt bits of the bucket...

WELD the back side.


Fabricate some spokes.


Attach spokes to wheel.


Improvise alignment tool to get wheel "pretty darn" straight, and tack weld.


Weld it, sand blast it, and wire wheel it.


Slap a coat of paint on it and Bob's your uncle!


You can see where the square piece busted out the center of the plastic wheel. I reused that on the new one- and its pretty much just an interference fit inside the square tube at the center of the new wheel. Might eventually weld it, we'll see how it lasts.

Installed.


Ran it around pushing dirt / gravel, seemed to work great. Steering wheel is solid, seat is comfy, and I even gouged the blade in hard a time or two and the driveline didn't break! (knock on wood)

Now to get the deck, tiller, and snow thrower down here.

Sunday, October 27, 2013

Dan's Chariot #10- Trailer in MOTION!

Time to get 'er done.

Fender mounts.


Spent some time polishing off all the nasty beads you get when using a flux core wire feed welder.


Frame "done", ready for assembly so testing can commence!


Install basket.


Install foot pan.


Install seat.


Install belts.


Make yet ANOTHER axle... and install it. The smaller rod above the axle is an interference fit, holds the axle in there nice and tight. It can be removed with a hammer and a punch sorta easily if I want to change the axle later.


Assembled!


Trailer hitch.


Ready to go.


Will definitely need a fender on the back wheel.


Turns pretty sharp before the tire rubs on the tongue!


And for your viewing enjoyment, some video. Please excuse my skinny butt...


Really close now!  Need to dig my bike out so I can hook it up to a bike that doesn't have parts falling off of it every 30 feet or so (this is a "school" bike - and has had dozens of 12 year olds working on it...).  Still need to make a caster attachment, but other than that, barring any failures during testing, I think the hard parts done!